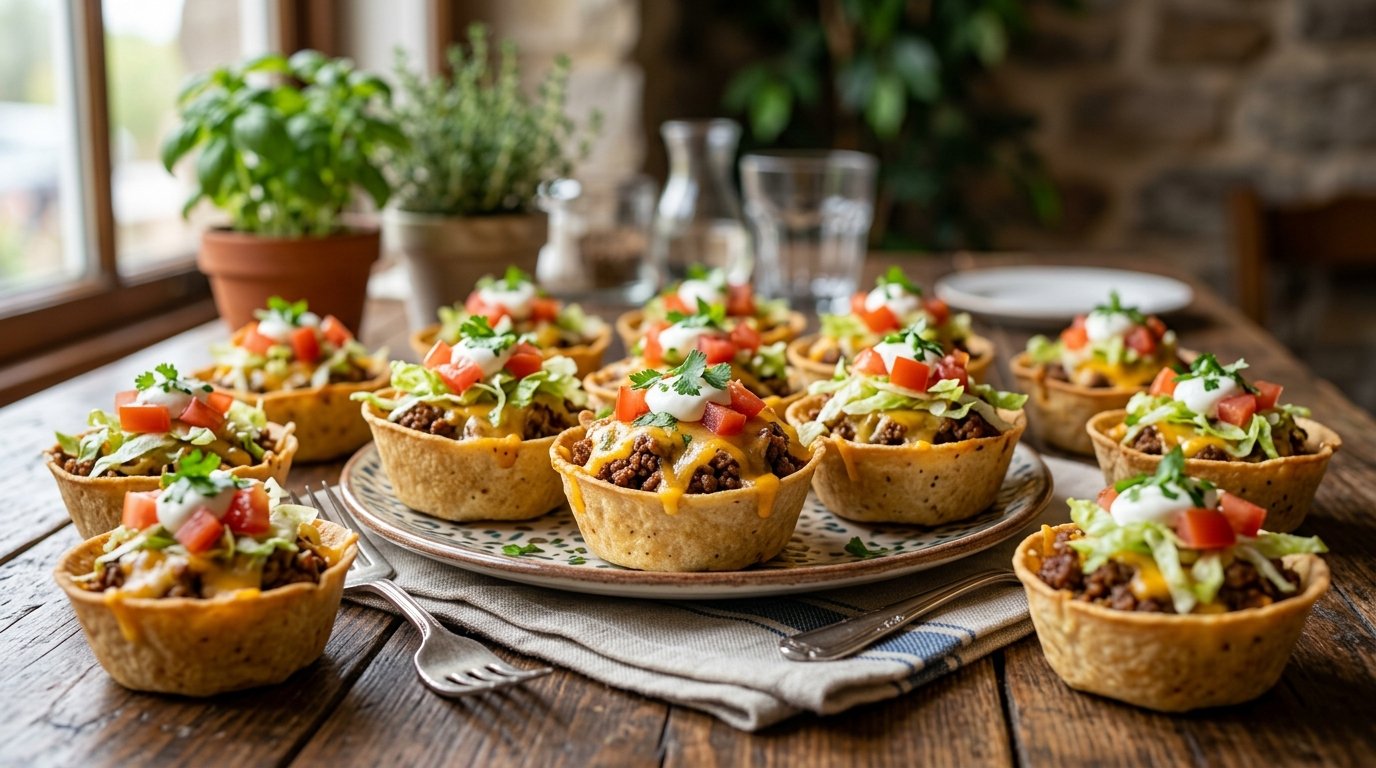
There is a specific kind of culinary magic that happens when you transform humble tortillas into edible vessels that are simultaneously shatteringly crisp and generously filled with savory, cheesy goodness. These Crunchy Taco Cups are not just an appetizer; they are a textural revelation that redefines how we experience taco night. By pressing small flour tortillas into a muffin tin and baking them at high heat, we create sturdy, golden-brown cups that hold their shape without the need for deep frying or messy assembly. The result is a bite-sized masterpiece where every layer—from the crispy shell to the seasoned meat, melted cheese, and fresh toppings—is perfectly proportioned and impossible to drop.
This recipe bridges the gap between party snack and satisfying meal. Unlike traditional tacos that can become soggy or fall apart in your hands, these cups maintain structural integrity from oven to plate to mouth. The two-stage baking process ensures the shell achieves maximum crunch before being loaded with fillings, while the final brief bake melts the cheese into a gooey blanket that binds everything together. Whether you are hosting game day, feeding picky eaters, or simply craving something fun and flavorful, this technique delivers consistent, crowd-pleasing results that elevate simple ingredients into something extraordinary.
Why This Recipe Works
The success of Crunchy Taco Cups lies in the physics of starch gelatinization and moisture management. Flour tortillas contain gluten and starch that, when exposed to dry, high heat (425°F/220°C), rapidly dehydrate and set into a rigid structure. Pressing them into a muffin tin creates uniform curvature and surface area exposure, ensuring even crisping without burning. The initial “blind bake” (baking empty shells) is critical; it removes internal moisture that would otherwise steam the shell during filling, guaranteeing a crunch that lasts even under warm toppings.
Furthermore, the layering sequence is engineered for stability. Seasoned meat provides a dense, flavorful base that anchors lighter ingredients. Cheese acts as both adhesive and insulator; melting directly onto the hot shell and meat creates a seal that prevents sogginess from wetter toppings like salsa or sour cream added later. Fresh garnishes applied post-bake preserve their texture and brightness, contrasting beautifully with the warm, crispy foundation. This intentional architecture transforms what could be a messy pile of ingredients into a cohesive, handheld experience where flavor and texture are balanced in every single bite.
Why You’ll Love This Recipe
Unbeatable Texture: Shatteringly crisp shells that stay crunchy even when loaded—no soggy bottoms here.
Perfect Portion Control: Bite-sized cups eliminate mess and waste; ideal for parties, kids, or mindful eating.
Versatile Canvas: Endless filling combinations make this adaptable to any dietary preference or flavor craving.
Quick & Efficient: From prep to table in under 35 minutes using basic kitchen tools.
Kid-Friendly Fun: Interactive, customizable cups engage younger eaters who might reject traditional tacos.
Budget Conscious: Uses affordable staples like ground beef, tortillas, and cheese stretched into impressive portions.
Visual Appeal: Golden cups topped with vibrant garnishes look stunning on any platter or buffet table.
Ingredient Notes
Small Flour Tortillas (Street Taco Size)
Purpose: Forms the edible cup structure. Flour tortillas crisp better than corn due to gluten content and fat. Small size (4-6 inch) fits standard muffin tins perfectly.
Substitutions: Corn tortillas (gluten-free option; may be more brittle). Large flour tortillas cut into circles with cookie cutter. Low-carb wraps work but may burn faster.
Buying Tips: Choose fresh, pliable tortillas—not stale or cracked. Check expiration; dry tortillas won’t mold properly. Refrigerated section often has superior quality vs. shelf-stable.
Storage Tips: Keep sealed at room temperature up to 1 week. If stiff, microwave 10 seconds wrapped in damp paper towel before pressing. Pliability = successful molding.
Ground Beef (80/20 or 85/15)
Purpose: Primary protein and flavor base. Fat content ensures juiciness and carries seasoning. Leaner blends risk dryness.
Substitutions: Ground turkey/chicken (add 1 tbsp oil to prevent dryness). Plant-based crumbles. Shredded chicken or pork. Beans for vegetarian version.
Buying Tips: Look for bright red color, minimal gray/brown spots. Smell should be clean/meaty. Avoid pre-seasoned mixes; control your own spice level.
Storage Tips: Refrigerate up to 2 days. Freeze in portioned bags up to 3 months. Thaw overnight in fridge before cooking.
Substitutions: Homemade blend (1 tbsp chili powder, 1 tsp cumin, ½ tsp each garlic/onion powder/paprika/salt/pepper). Fajita seasoning. Cajun blend for twist.
Buying Tips: Check labels for fillers/sugar. Quality brands list spices first. Make your own for freshest flavor and sodium control.
Storage Tips: Store in airtight container away from light/heat. Spices lose potency after 6 months. Replace regularly.
Shredded Cheddar or Mexican Blend Cheese
Purpose: Melting agent, binder, salty contrast. Creates gooey layer that seals shell and holds toppings.
Substitutions: Monterey Jack (better melt), Pepper Jack (spicy kick), Mozzarella (milder stretch). Avoid pre-shredded if possible.
Buying Tips:Crucial: Buy block cheese and shred yourself. Pre-shredded contains anti-caking agents (cellulose) that inhibit smooth melting and cause greasiness.
Storage Tips: Grate only what you need. Store block in wax paper in fridge up to 4 weeks. Shredded cheese lasts 3-5 days max.
Purpose: Adds freshness, acidity, creaminess, and color contrast to warm/crispy base. Balances richness.
Substitutions: Guacamole, pico de gallo, pickled onions, jalapeños, hot sauce. Customize to taste.
Buying Tips: Crisp lettuce (romaine/iceberg), firm tomatoes, fresh cilantro. Sour cream full-fat for best texture/flavor.
Storage Tips: Wash/dry lettuce thoroughly; store in crisper with paper towel. Dice tomatoes day-of. Herbs in damp paper towel in fridge.
Kitchen Equipment
Standard Muffin Tin (12-cup): Essential for shaping cups. Non-stick preferred for easy release. Light-colored metal promotes even browning; dark pans may over-brown bottoms.
Small Skillet: For browning meat. Cast iron or stainless steel preferred for even heat. Non-stick works but doesn’t develop fond as well.
Wooden Spoon or Spatula: For breaking up meat and stirring seasoning. Heat-resistant silicone protects non-stick surfaces.
Measuring Spoons/Cups: Precision matters for seasoning balance. Too much salt = overpowering; too little = bland.
Pastry Brush (Optional): For brushing tortillas lightly with oil/butter before baking. Enhances crispness and browning. Not mandatory but recommended.
Cooling Rack: For cooling baked shells before filling. Air circulation prevents steam buildup that softens crispness.
Tongs or Small Spoon: For precise filling placement without crushing shells. Prevents mess and maintains structure.
Step-by-Step Instructions
H3: Step 1 – Season & Cook the Meat
In bowl, combine 1 lb ground beef with 2-3 tbsp taco seasoning. Mix gently with hands or spoon until evenly coated. Heat skillet over medium-high. Add meat, breaking into small crumbles with wooden spoon. Cook 5-7 mins until no pink remains and meat is browned. Drain excess fat if desired (leave 1 tbsp for moisture). Remove from heat.
Why this matters: Mixing seasoning into raw meat ensures even distribution throughout crumbles. Breaking into small pieces ensures uniform cooking and better filling texture. Draining prevents greasy, heavy cups.
Visual Cue: Meat turns from pink to deep brown. Crumbles are distinct, not clumped. Pan shows rendered fat but not pooling liquid.
Texture Cue: Meat feels firm, crumbly. Not mushy or pasty. Juices run clear when pierced.
Aroma Cue: Savory, spiced meat scent fills kitchen. Toasted cumin/chili notes prominent. No raw meat smell.
Common Mistake: Overcooking meat until dry/crumbly. Fix: Remove from heat when just browned. Residual heat finishes cooking. Moisture is key.
Professional Tip: Deglaze pan with 2 tbsp water/broth after browning. Scrape up fond (browned bits). Mix into meat. Adds depth without extra liquid.
H3: Step 2 – Form & Blind Bake the Shells
Preheat oven to 425°F (220°C). Press one tortilla into each muffin cup, centering and smoothing against sides/bottom. Create slight rim above edge for topping capacity. Optional: brush lightly with oil/butter. Bake 8-10 mins until edges are golden brown and centers are set. Remove from oven. Let cool in tin 2 mins, then transfer to wire rack. Cool COMPLETELY before filling.
Why this matters: High heat rapidly dehydrates tortilla, setting structure. Pressing firmly eliminates air pockets that cause uneven baking. Cooling completely prevents steam from softening crisp shell when filled. Wire rack allows air circulation underneath.
Visual Cue: Edges turn deep golden brown. Centers look matte/dry, not shiny/wet. Shell holds shape when lifted.
Texture Cue: Shell feels rigid, crisp. Sounds hollow when tapped. Not flexible or soft.
Common Mistake: Underbaking shells. Results in chewy/soggy cups. Fix: Trust color/texture, not timer. Extend 2-3 mins if pale. Ovens vary.
Professional Tip: Rotate tin halfway through bake for even browning. Bottom rack placement crisps base. Top rack may burn rims.
H3: Step 3 – Fill & Cheese Melt
Spoon 1-2 tbsp cooked meat into each cooled shell. Top with 1-2 tbsp shredded cheese. Return to oven. Bake 3-5 mins until cheese is fully melted and bubbly. Watch closely! Remove immediately when cheese is molten but not browned.
Why this matters: Meat layer provides weight/base for cheese. Cheese melts directly onto hot shell/meat, creating seal. Brief bake warms filling without softening shell. Overbaking burns cheese and dries meat.
Visual Cue: Cheese transforms from shredded to smooth/glossy. Bubbles form at edges. Meat steams slightly. Shell remains crisp.
Texture Cue: Cheese gooey/stretchy. Meat warm/juicy. Shell still crisp underneath.
Common Mistake: Overfilling cups. Causes overflow/mess. Fix: Leave ¼-inch space at top. Less is more for structural integrity.
Professional Tip: Use broiler last 30-60 secs IF cheese isn’t melting. WATCH CONSTANTLY. Burns in seconds. Oven bake safer for beginners.
H3: Step 4 – Garnish & Serve Immediately
Remove from oven. Let rest 1 min (cheese sets slightly). Top each cup with shredded lettuce, diced tomato, dollop of sour cream, and cilantro. Serve IMMEDIATELY while shells are still crisp.
Why this matters: Resting allows cheese to stabilize, preventing slide-off. Fresh toppings add contrast in temp/texture/flavor. Immediate service preserves crispness; delay = sogginess.
Visual Cue: Vibrant green/red/white toppings against golden shell. Cheese glossy. Steam rising subtly.
Aroma Cue: Fresh herbs/tomato cut through richness. Balanced, appetizing bouquet.
Common Mistake: Adding wet toppings (salsa/pico) pre-bake. Softens shell instantly. Fix: Always add wet garnishes POST-bake, just before serving.
Professional Tip: Set up garnish station buffet-style. Lets guests customize. Keeps shells crisp until eaten. Presentation matters!
Expert Tips for Maximum Crispness
Dry Heat is Key: Ensure oven is FULLY preheated to 425°F before baking shells. Cold oven = steamed, chewy tortillas. Use oven thermometer to verify accuracy.
Oil Brushing Boost: Lightly brushing tortillas with neutral oil or melted butter before baking enhances browning and crispness via fat conduction. Don’t soak; thin coat only.
Cool Completely Before Filling: Warm shells release steam when filled, destroying crispness. Cool on wire rack 10+ mins. Touch test: should feel room temp, not warm.
Cheese as Sealant: Melt cheese DIRECTLY onto shell/meat. Creates moisture barrier against wet toppings. Don’t skip this step; it’s structural.
Garnish Last-Minute: Assemble cups no more than 5 mins before serving. Wet toppings are crispness killers. Stage components separately for buffet efficiency.
Shell Thickness Matters: Thin tortillas crisp faster/better. Thick ones may stay chewy. Choose “street taco” or “soft taco” size, not burrito wraps.
Common Mistakes to Avoid
Underbaking Shells: Chewy, soggy base ruins entire cup. Fix: Bake until deeply golden. Trust visual cues over timer. Extend time if needed.
Filling While Hot: Steam softens crisp shell instantly. Fix: Cool shells completely on wire rack. Patience = crunch.
Cook Meat Ahead: Brown and season meat up to 3 days ahead. Store in airtight container. Reheat before filling. Flavors improve overnight.
Bake Shells Ahead: Blind bake shells up to 24 hours ahead. Store in airtight container at room temp. Recrisp in 350°F oven 3-5 mins before filling if needed.
Pre-Shred Cheese: Shred cheese up to 2 days ahead. Store in airtight container with parchment between layers to prevent clumping.
Prep Toppings Ahead: Wash/dry lettuce, dice tomatoes, chop cilantro up to 1 day ahead. Store separately in airtight containers. Assemble garnishes just before serving.
Freeze Unfilled Shells: Bake shells, cool completely, freeze in airtight bag up to 1 month. Thaw at room temp, recrisp in oven before filling. Convenient future use.
Storage & Reheating Instructions
Storage
Refrigerator: Store UNFILLED baked shells in airtight container up to 3 days. Filled cups do NOT store well; shells soften rapidly. Store components separately.
Freezer: Freeze unfilled shells up to 1 month. Thaw at room temp, recrisp in oven. Do NOT freeze filled cups; texture destruction inevitable.
Reheating
Oven (Best for Shells): 350°F (175°C) for 3-5 mins on wire rack. Restores crispness effectively. Avoid direct pan contact (soggy bottom).
Air Fryer: 350°F (175°C) for 2-3 mins. Excellent revival method. Shake basket halfway. Spray lightly with oil if dried out.
Microwave (Avoid for Shells): Steams tortilla, destroys crispness. Only use for reheating meat filling separately. Accept sogginess trade-off.
Stovetop: Dry skillet over medium-low, 1-2 mins per side. Revives some crispness. Good for single shells. Watch closely to prevent burning.
Nutritional Information
Estimates per serving (2 cups):
Calories: 280 kcal
Protein: 14g
Carbohydrates: 22g
Fat: 16g
Fiber: 2g
Sugar: 2g
Sodium: 580mg
Note: Values vary based on tortilla brand, meat fat %, cheese amount, and topping choices. Always check labels for precise tracking.
Troubleshooting Guide
Problem
Cause
Solution
Shells Soggy/Chewy
Underbaked or filled while warm.
Bake until deeply golden next time. Cool COMPLETELY on wire rack before filling. Extend bake 2-3 mins.
Shells Burnt
Oven too hot or baked too long.
Reduce temp to 400°F next time. Check at 7 mins. Rotate tin halfway. Dark pans burn faster.
Cheese Didn’t Melt
Oven too cool or wrong cheese.
Ensure oven fully preheated. Use freshly grated block cheese. Extend melt time 1-2 mins. Broil briefly if needed.
Cups Collapse
Overfilled or shells underbaked.
Reduce filling amount. Bake shells longer for stronger structure. Press tortillas firmly into tin.
Toppings Make Cups Soggy
Added too early or too wet.
Garnish ONLY after final bake, just before serving. Pat lettuce/tomatoes dry. Use thick sour cream, not runny.
Meat Dry/Crumbly
Overcooked or lean beef used.
Cook meat just until browned. Use 80/20 or 85/15 fat ratio. Add splash broth/water if dry.
Frequently Asked Questions
1. Can I use corn tortillas instead of flour? Yes, but they behave differently. Corn tortillas are smaller/more brittle. May crack when pressed. Warm extensively before molding. Bake 2-3 mins less; they crisp faster. Gluten-free option worth trying!
2. How do I prevent shells from sticking to muffin tin? Lightly grease tin with oil/butter spray OR use silicone muffin liners. Silicone guarantees easy release. Greasing works but requires careful removal. Test one first if unsure.
3. Can I make these ahead for a party? Bake shells up to 24 hrs ahead. Store airtight at room temp. Recrisp in 350°F oven 3-5 mins before filling. Fill/melt cheese 10 mins before serving. Garnish LAST MINUTE. Perfect timing = crisp cups.
4. Why did my shells turn out chewy instead of crispy? Oven not hot enough or underbaked. Verify temp with thermometer. Bake until DEEPLY golden, not pale. Extend time 2-3 mins. Thin tortillas crisp better than thick ones.
5. Can I freeze filled taco cups? Not recommended. Shells become soggy upon thawing/reheating. Cheese separates. Texture destroyed. Freeze UNFILLED shells only. Fill fresh when ready to serve.
6. What’s the best cheese for melting? Freshly grated Monterey Jack or mild cheddar. Avoid pre-shredded (anti-caking agents inhibit melt). Mozzarella adds stretch but less flavor. Blend cheeses for best results.
7. Can I make these vegetarian/vegan? Absolutely! Use black beans/lentils/plant-based crumbles. Vegan cheese shreds (test meltability first). Cashew sour cream. Verify all ingredients certified vegan. Delicious adaptation!
8. How do I keep shells crisp at a buffet? Set up assembly station: shells, warm meat/cheese, cold toppings separate. Guests build own cups. Prevents pre-sogginess. Keep shells covered until served. Refresh in oven if needed.
Final Thoughts
Creating exceptional Crunchy Taco Cups is about respecting the process and understanding how heat, moisture, and timing interact to create perfection. The transformation of a simple tortilla into a sturdy, crispy vessel is nothing short of culinary alchemy. This recipe proves that innovation doesn’t require complexity—it demands attention to detail and willingness to experiment with familiar ingredients.