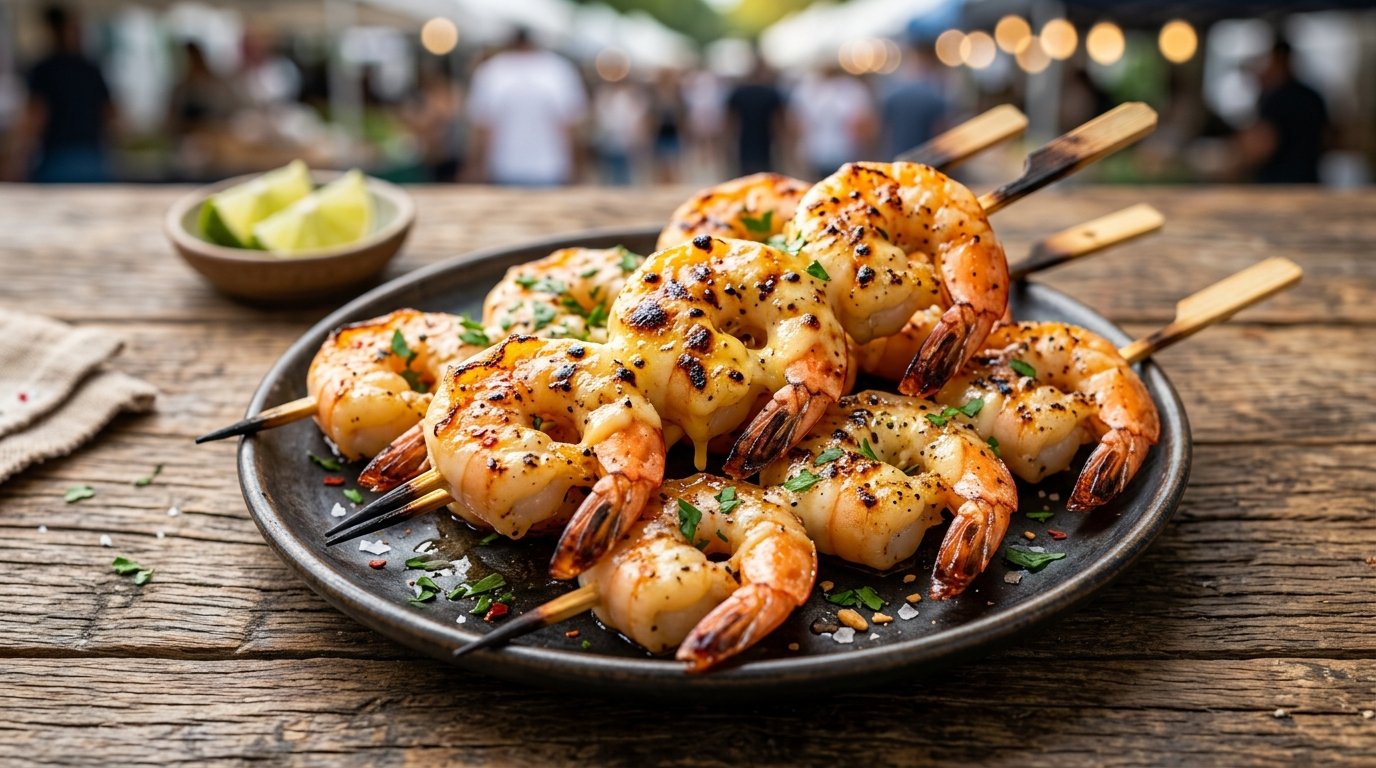
If you have ever wandered through the vibrant, neon-lit streets of a Japanese night market or a bustling Asian food festival, you have likely been stopped in your tracks by a specific, mouth-watering aroma: the scent of caramelizing butter, searing seafood, and melting cheese. Today, we are bringing that exact street food magic right into your kitchen with these Cheesy Butter Torched Shrimp Skewers.
This recipe is the ultimate marriage of surf and turf-style indulgence, minus the beef. We are talking about plump, juicy shrimp seared in rich, foaming butter, blanketed in a thick layer of gooey, blistered mozzarella, and finished with a drizzle of sweet and savory sauces. The result is a dramatic, Instagram-worthy cheese pull that tastes even better than it looks. Whether you are hosting a backyard barbecue, looking for an impressive appetizer, or just craving a high-end street food experience at home, this recipe delivers big on flavor and visual impact.
The secret to a perfect Cheesy Butter Torched Shrimp Skewer lies in the precise control of heat and the layering of flavors. Shrimp cooks incredibly fast, and the biggest risk is turning it into a rubbery, tough disappointment. By searing the shrimp quickly in hot butter and then finishing it with a culinary blowtorch, we achieve a beautiful char and caramelization without overcooking the delicate interior.
Furthermore, the flavor profile relies on the “holy trinity” of Japanese street food sauces: rich, fatty butter; creamy, tangy mayonnaise; and sweet, umami-packed eel (unagi) sauce. When you add the salty, stretchy mozzarella cheese into the equation, every single bite hits a different pleasure center in your brain. The blowtorch doesn’t just melt the cheese; it creates those signature brown, toasted spots that add a subtle smokiness, elevating the dish from a simple shrimp skewer to a gourmet street food masterpiece.
Why You’ll Love This Recipe
The Ultimate Cheese Pull: The combination of the blowtorch and the right cheese guarantees a dramatic, satisfying stretch that is perfect for social media and your tastebuds.
Restaurant-Quality at Home: You don’t need a flat-top teppanyaki grill to get this result; a heavy cast-iron skillet works beautifully.
Incredibly Fast: From prep to plate, this dish takes less than 30 minutes, making it perfect for weeknight dinners or last-minute guests.
Flavor Bomb: The contrast between the sweet eel sauce, tangy mayo, rich butter, and savory cheese creates a complex flavor profile that keeps you coming back for more.
Customizable: You can easily adjust the spice level, swap the proteins, or change the sauces to fit your dietary preferences.
Ingredient Notes
To achieve the authentic street food taste and texture, selecting the right ingredients is crucial. Here is a deep dive into what you need and why.
The Shrimp
Purpose: The star of the dish. We want large, meaty shrimp that can hold up to the high heat of the grill and the blowtorch without shrinking into nothingness.
Buying Tips: Look for “U15” or “U20” shrimp (meaning 15 to 20 shrimp per pound). Buy them raw, peeled, and deveined, but keep the tails on. The tails act as a natural handle for eating and prevent the shrimp from curling up too tightly on the skewer.
Substitutions: If you can’t find large shrimp, you can use large sea scallops, though the cooking time will vary slightly.
Storage Tips: Keep raw shrimp in the coldest part of your refrigerator and cook within 1-2 days of purchasing. If frozen, thaw them overnight in the fridge, never in hot water.
The Cheese
Purpose: To provide the gooey, stretchy texture and salty, creamy flavor that defines this dish.
Buying Tips: You need a cheese with excellent melting properties and low moisture. Low-moisture, whole-milk mozzarella is the gold standard here. Avoid pre-shredded cheese in bags, as it is coated in cellulose (anti-caking agents) which prevents it from melting smoothly and can result in a gritty texture. Buy a block and shred it yourself.
Substitutions: Provolone, Monterey Jack, or a mild white cheddar will also melt beautifully.
The Butter
Purpose: Used for basting and searing. Butter contains milk solids that brown and create a nutty, rich flavor (beurre noisette) that coats the shrimp.
Buying Tips: Always use unsalted butter so you can control the sodium level. High-quality, European-style butter with a higher fat content (82%+) will yield the best flavor and less splattering.
The Sauces
Japanese Mayonnaise (Kewpie): Unlike American mayo, Kewpie is made with only egg yolks and rice vinegar, giving it a richer, more umami-forward, and slightly tangy flavor. It is essential for the authentic taste.
Unagi (Eel) Sauce: This is a thick, sweet, and savory glaze made from soy sauce, mirin, sugar, and sake. It provides the dark, glossy finish and a deep umami punch.
Substitutions: If you can’t find Kewpie, mix regular mayo with a dash of rice vinegar and a pinch of sugar. For Unagi sauce, a high-quality Teriyaki glaze or even a mix of hoisin and soy sauce can work in a pinch.
The Garnish
Purpose: Adds a pop of color and a fresh, herbaceous note to cut through the richness of the cheese and butter.
Buying Tips: Fresh flat-leaf parsley or finely chopped green onions (scallions) work best. Dried parsley is acceptable if fresh is unavailable, but fresh is highly preferred for the vibrant color.
Kitchen Equipment
Having the right tools makes the process seamless and safe.
Wooden Skewers: Bamboo or wooden skewers are traditional. Crucial tip: If you are cooking these on a grill or in an oven, soak them in water for 30 minutes first to prevent burning. Since we are using a skillet and blowtorch, soaking isn’t strictly necessary, but it’s a good habit.
Flat-Top Grill or Cast-Iron Skillet: A flat-top gives you the authentic street food vibe and plenty of surface area for the butter to pool. A heavy-bottomed cast-iron skillet is the best home alternative because it retains heat incredibly well.
Culinary Blowtorch: This is non-negotiable for this specific recipe. A standard kitchen torch (butane or propane) is needed to blister the cheese and finish the shrimp.
Metal Spatula: For flipping the shrimp and moving them around the pan.
Squeeze Bottles: For the mayonnaise and eel sauce. This ensures clean, professional-looking drizzles.
Paper Boats or Small Plates: For serving.
Preparation Information
Prep Time: 15 minutes (Peeling, deveining, skewering, and shredding cheese).
Cook Time: 10 minutes (Searing and torching).
Total Time: 25 minutes.
Servings: 4 large skewers (using 3-4 shrimp per skewer).
Step-by-Step Instructions
Step 1: Skewer the Shrimp
Take your peeled, deveined shrimp (tails left on). Thread them onto the wooden skewers. The best way to do this is to pierce the tail end first, then gently curve the shrimp and pierce the head end, creating a slight “C” shape. Aim for 3 to 4 large shrimp per skewer.
Why this matters: Skewering them flat ensures even contact with the pan, which means even cooking and better browning.
Pro Tip: If your shrimp are prone to curling up tightly, make a few shallow, horizontal cuts along the inner curve (the belly) of the shrimp before skewering. This severs the muscle fibers and keeps them straight.
Step 2: The Butter Sear
Heat your cast-iron skillet or flat-top grill over medium-high heat. Add a generous amount of butter (about 1-2 tablespoons per skewer). Once the butter is melted, foaming, and just starting to smell nutty, place the shrimp skewers in the pan.
Visual & Aroma Cues: The butter should be bubbling vigorously. You will smell the rich, toasted aroma of the milk solids.
What to do: Sear the shrimp for about 1.5 to 2 minutes per side. Use your spatula to spoon the hot, foaming butter over the tops of the shrimp as they cook (basting).
Texture Cue: The shrimp should turn opaque and pink, with golden-brown edges. Do not cook them all the way through yet; they will finish cooking under the blowtorch.
Step 3: The Initial Torch
Remove the skewers from the pan and place them on a heat-proof surface or directly into your paper serving boats. Take your culinary blowtorch and run the flame evenly over the shrimp.
Why this matters: This step adds a smoky, charred flavor to the outside of the shrimp and finishes cooking the interior without drying it out in the pan.
Technique: Keep the torch moving in a circular motion. Hold it about 2-3 inches away from the shrimp. You are looking for light char marks, not burning the shrimp to a crisp.
Step 4: Cheese and the Final Torch
While the shrimp are still sizzling hot, generously pile the freshly shredded mozzarella cheese over the top of each skewer. You want a thick, even blanket of cheese. Immediately take the blowtorch again and melt the cheese.
Visual Cues: The cheese will quickly melt, bubble, and then start to develop golden-brown, toasted spots. This is the Maillard reaction happening on the cheese proteins and sugars.
Texture Cue: The cheese should be completely melted and gooey, with slightly crispy, blistered edges.
Common Mistake: Holding the torch in one spot for too long will burn the cheese, making it bitter. Keep it moving!
Step 5: Saucing and Garnishing
Once the cheese is perfectly melted and blistered, it’s time to dress the skewers. Take your squeeze bottles and drizzle the Japanese mayonnaise in a zigzag pattern across the skewers. Follow this with a drizzle of the sweet Unagi (eel) sauce. Finally, sprinkle a pinch of finely chopped fresh parsley or green onions over the top.
Why this matters: The mayo adds a creamy, tangy richness, the eel sauce adds a deep, sweet umami, and the herbs cut through the heavy fats with a fresh, bright note. Serve immediately while the cheese is still stretchy!
Expert Tips
Dry Your Shrimp: Before skewering and cooking, pat your shrimp completely dry with paper towels. Moisture is the enemy of a good sear. If the shrimp are wet, they will steam in the pan instead of caramelizing in the butter.
Shred Your Own Cheese: I cannot stress this enough. Pre-shredded cheese contains anti-caking agents like potato starch or cellulose. These prevent the cheese from melting into a smooth, cohesive layer and can result in a grainy texture. Buy a block of low-moisture mozzarella and use a box grater.
Control the Torch: If you are new to using a culinary blowtorch, practice on a piece of bread first. The flame is incredibly hot and can burn food in seconds. Keep the flame moving and maintain a safe distance.
Work in Batches: If you are cooking for a crowd, do not overcrowd the pan. Overcrowding drops the pan temperature, causing the shrimp to release water and steam rather than sear. Cook in batches to ensure a perfect crust.
Common Mistakes
Rubbery, Tough Shrimp:
Why it happens: Overcooking. Shrimp cook in minutes. If you leave them in the pan until they are fully cooked, the blowtorch will overcook them further.
How to fix: Pull them from the pan when they are about 80% cooked (slightly translucent in the very center). The residual heat and the blowtorch will finish them perfectly.
Cheese Sliding Off:
Why it happens: The shrimp are too wet, or the cheese is piled too high without a base.
How to fix: Ensure the shrimp are dry after the initial sear. Press the cheese down slightly so it adheres to the curves of the shrimp before torching.
Burnt, Bitter Cheese:
Why it happens: Holding the blowtorch too close or keeping it stationary.
How to fix: Keep the torch moving constantly. The goal is to melt and blister, not carbonize. If it does burn, scrape off the black bits and re-torch a fresh layer of cheese.
Recipe Variations
Spicy Mayo Shrimp: Mix a tablespoon of Sriracha or chili garlic sauce into your Japanese mayonnaise. Drizzle this spicy mayo over the finished skewers for a fiery kick.
Garlic Herb Butter: Infuse your melting butter with minced garlic and fresh thyme or rosemary during the searing stage for an extra layer of aromatic flavor.
Chicken Teriyaki Skewers: Swap the shrimp for bite-sized pieces of chicken thigh. Cook them thoroughly in the butter, then proceed with the cheese, torch, and sauce method. (Note: Chicken requires a longer cooking time in the pan).
Vegan “Shrimp” Skewers: Use large king oyster mushroom slices or high-quality vegan shrimp alternatives. Substitute the butter with vegan butter, use vegan mozzarella cheese, and ensure your mayo and eel sauce are plant-based.
Bacon-Wrapped: Before skewering, wrap each shrimp in a thin slice of bacon. Secure with a toothpick, sear until the bacon is crispy, then add the cheese and torch.
Extra Cheesy: Mix grated Parmesan or Pecorino Romano into your mozzarella before sprinkling it on. This adds a sharp, salty depth to the melt.
What to Serve With This Recipe
These skewers are rich and decadent, so they pair best with light, refreshing, or acidic sides to balance the palate.
Side Dishes: Steamed white rice or garlic fried rice to soak up any extra butter and sauce. Edamame with sea salt is also a classic, light pairing.
Salads: A crisp, acidic Asian cucumber salad with rice vinegar, sesame oil, and chili flakes cuts right through the richness of the cheese. A simple mixed greens salad with a ponzu dressing works well too.
Sauces: While the skewers are already sauced, a side of sweet chili sauce or a citrusy ponzu for dipping is a nice addition.
Drinks: A cold, crisp Japanese lager (like Asahi or Sapporo) is the perfect pairing. For a non-alcoholic option, sparkling yuzu soda or iced green tea.
Dessert: Keep it light. Mochi ice cream or a simple matcha sorbet provides a refreshing, sweet finish to the meal.
Make Ahead & Meal Prep Tips
While these skewers are best enjoyed fresh off the torch, you can prep the components in advance to speed up the cooking process.
Prep the Shrimp: You can peel, devein, and skewer the shrimp up to 24 hours in advance. Store them covered in the refrigerator.
Prep the Cheese: Shred your cheese and store it in an airtight container in the fridge.
Sauce Prep: Mix your spicy mayo or have your squeeze bottles filled and ready to go.
Note: Do not cook the shrimp or melt the cheese until you are ready to serve. Reheating melted cheese and cooked shrimp rarely yields the same perfect texture.
Storage Instructions
Refrigerator: Store leftover skewers in an airtight container in the refrigerator for up to 2 days. Keep the sauces separate if possible, as they can make the reheated cheese soggy.
Freezer: It is not recommended to freeze these skewers once the cheese is melted and the shrimp is cooked, as the texture of the shrimp and cheese will degrade significantly upon thawing. However, you can freeze the raw, skewered shrimp (without cheese or sauce) for up to 3 months. Thaw in the fridge before cooking.
Reheating Instructions
Reheating cheese-covered shrimp is tricky, but here are the best methods to restore some of the original magic.
Air Fryer (Best Method): Preheat your air fryer to 350°F (175°C). Place the skewers in the basket and heat for 3-4 minutes. This will crisp up the cheese and warm the shrimp without making it rubbery.
Oven: Preheat to 375°F (190°C). Place skewers on a baking sheet lined with foil. Bake for 5-7 minutes until heated through. If the cheese needs re-melting, broil for the last 1-2 minutes (watch closely!).
Stovetop: Place a non-stick skillet over medium-low heat. Add a tiny splash of water to the pan and cover with a lid to steam the skewers gently for 3-4 minutes. Uncover and let the cheese crisp up for a minute.
Microwave (Not Recommended): If you must use a microwave, do so in 30-second intervals. Be warned: the cheese will become tough and rubbery, and the shrimp may overcook.
Nutritional Information
Approximate values per skewer (based on 4 skewers, 3 large shrimp each, including cheese and sauces):
Calories: 320 kcal
Protein: 24g
Carbohydrates: 8g
Fat: 21g
Fiber: 0g
Sugar: 4g
Sodium: 680mg
Note: Nutritional values are estimates and will vary based on the exact size of the shrimp, the amount of butter/cheese used, and the specific brands of sauces.
Troubleshooting Guide
Problem
Cause
Solution
Shrimp are rubbery
Overcooked in the pan or under the torch.
Reduce pan searing time. Remove when 80% done. Keep the torch moving quickly.
Cheese isn’t melting
Wrong type of cheese or torch not hot enough.
Use low-moisture, whole-milk mozzarella. Ensure your torch is fully fueled and the flame is blue, not yellow.
Cheese is burning
Torch held too close or too long in one spot.
Keep the torch 2-3 inches away and use a continuous circular motion.
Shrimp curling too much
Natural muscle contraction.
Score the inner belly of the shrimp with a knife before skewering to sever the muscle fibers.
Soggy bottom
Too much butter or water released from shrimp.
Pat shrimp completely dry before cooking. Ensure pan is hot before adding butter.
Frequently Asked Questions
1. Can I use a regular oven broiler instead of a blowtorch? Yes, you can. Place the skewers on a baking sheet, top with cheese, and place under a preheated broiler on high. Watch them like a hawk—it takes only 1-2 minutes for the cheese to melt and blister. The blowtorch offers more precise control, but the broiler works in a pinch.
2. What if I don’t have Unagi (eel) sauce? You can make a quick substitute by mixing 2 tablespoons of soy sauce, 1 tablespoon of mirin (or water with a pinch of sugar), and 1 teaspoon of sugar. Simmer in a small pan until it thickens slightly. Alternatively, a good quality teriyaki sauce or even a balsamic glaze can provide a similar sweet and savory profile.
3. Can I use frozen shrimp for this recipe? Absolutely. Just ensure they are completely thawed and patted very dry before skewering. Thaw them overnight in the refrigerator for the best texture. Never cook shrimp from frozen for this recipe, as they will release too much water and steam instead of searing.
4. Is it safe to use a blowtorch on food? Yes, culinary blowtorches are specifically designed for food use. They use butane or propane, which burns cleanly. Just ensure you are using a kitchen-grade torch, not a hardware store torch (which may contain chemical additives). Always use it in a well-ventilated area and keep it away from flammable materials.
5. Can I make these without cheese? You can, but it changes the dish significantly. Without the cheese, you essentially have butter-seared, torched shrimp skewers. They will still be delicious, especially with the mayo and eel sauce, but you will lose the signature gooey texture and cheese pull.
6. What kind of skewers should I use? Flat wooden skewers (bamboo) are best because they grip the shrimp better and prevent them from spinning around when you try to flip them. If you only have round skewers, use two skewers per serving to keep the shrimp stable.
7. Can I use small or medium shrimp? It is not recommended. Small shrimp will cook too quickly, overcook easily under the torch, and won’t provide the substantial, meaty bite that makes this street food dish so satisfying. Stick to large (U15 or U20) shrimp.
8. How do I clean my blowtorch? Wipe the nozzle with a damp cloth after it has completely cooled. If the nozzle gets clogged with burnt cheese or food particles, use a small pin or needle to gently clear the opening. Never submerge the torch in water.
Final Thoughts
There is a reason why street food vendors have perfected these Cheesy Butter Torched Shrimp Skewers—they are an absolute triumph of texture and flavor. The combination of the sweet, charred shrimp, the rich, nutty butter, the gooey, blistered cheese, and the tangy-sweet sauces creates a symphony of taste in every single bite.