Quick Recipe Summary
| Prep Time | Cook Time | Total Time | Servings |
|---|---|---|---|
| 30 Minutes | 15-20 Minutes | 45-50 Minutes | 4 Burgers |
| Cuisine | Course | Difficulty | Calories (Est.) |
|---|---|---|---|
| Modern Fusion / American | Main Course | Intermediate | 680 kcal per burger |
Table of Contents
- Introduction
- Why This Recipe Works
- Why You’ll Love This Recipe
- Ingredient Notes
- Kitchen Equipment
- Step-by-Step Instructions
- Expert Tips for the Perfect Stuffing
- Common Mistakes to Avoid
- Recipe Variations
- What to Serve With This Recipe
- Make Ahead & Meal Prep Tips
- Storage & Reheating Instructions
- Nutritional Information
- Troubleshooting Guide
- Frequently Asked Questions
- Final Thoughts
Introduction

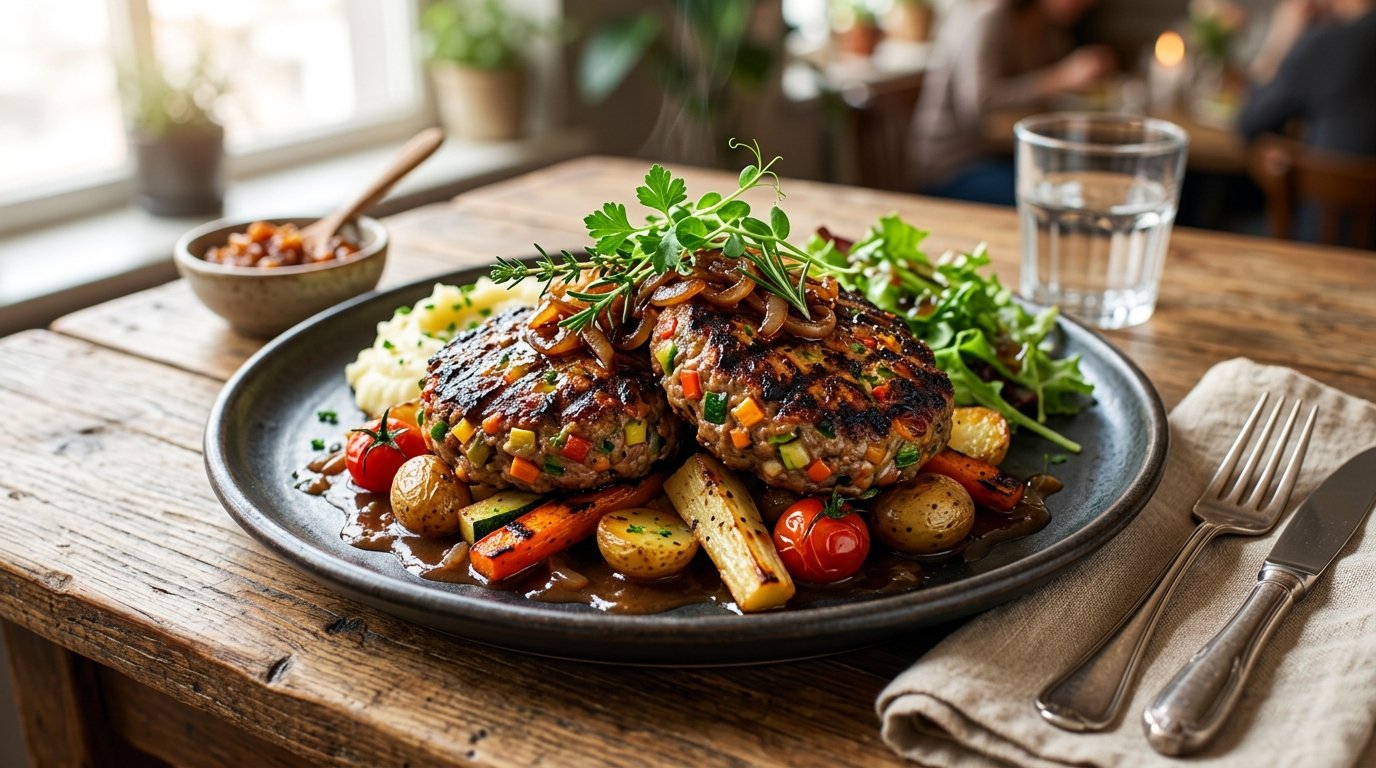
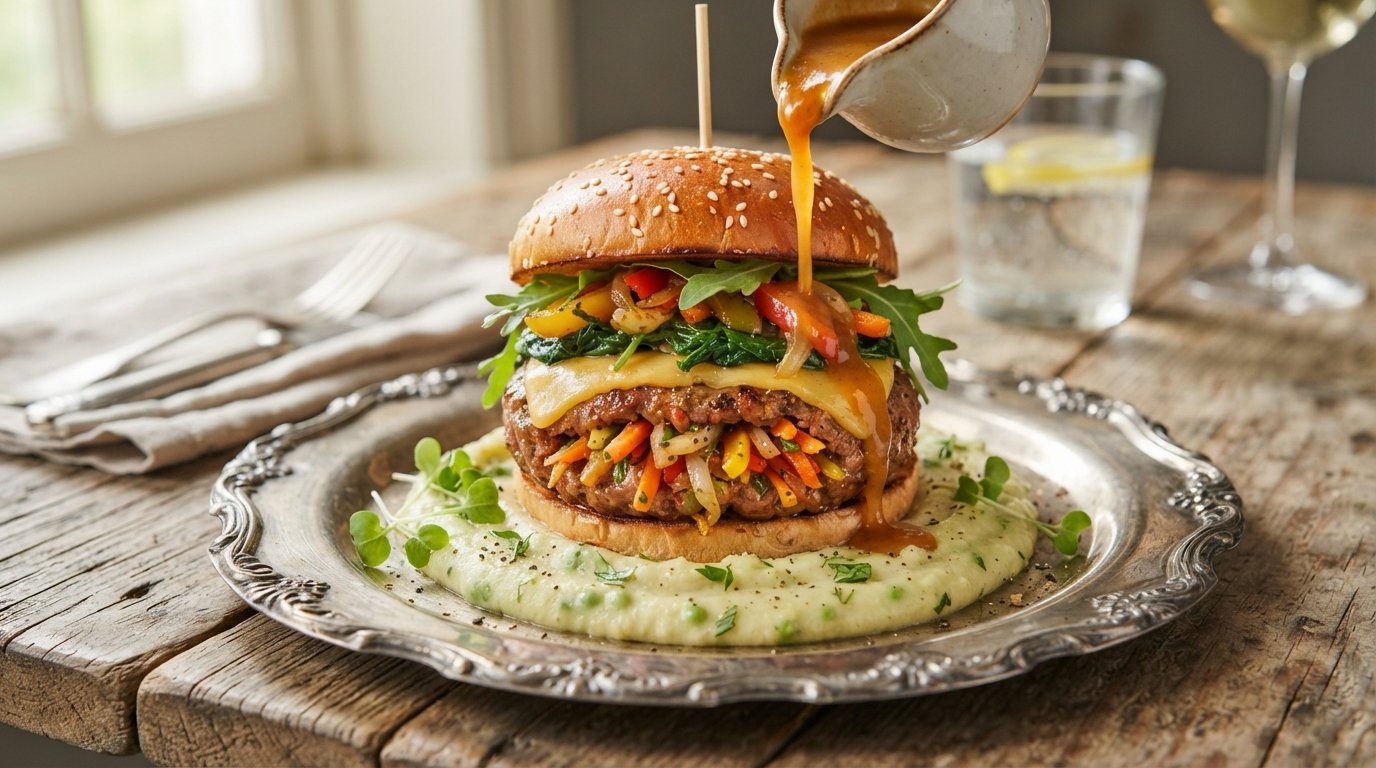
Forget everything you know about dry, crumbly veggie burgers or standard beef patties. This Ultimate Stuffed Burger is a masterclass in texture and flavor engineering, transforming humble ground meat into a juicy, savory centerpiece that rivals any steakhouse offering. By stuffing seasoned protein with a vibrant medley of sautéed vegetables and cheese, we create a burst of freshness and moisture in every bite. But the true genius lies in the presentation: served atop a velvety bed of herb-flecked mashed potatoes and finished with a rich, glossy gravy, this dish elevates “burger night” to fine-dining status.
Whether you are cooking for committed carnivores or looking to elevate your weeknight dinner rotation, this recipe delivers. The combination of the crisp sear on the outside, the molten cheese and tender veggies inside, and the comforting starch base creates a harmony of flavors that is simply unforgettable. Let’s build a burger that doesn’t just fill you up—it inspires you.
Why This Recipe Works
The secret to this burger’s success is moisture management and structural integrity. Most stuffed burgers fail because they are either too wet (falling apart) or too dry (tasteless). By pre-cooking the vegetable filling (spinach, peppers, onions), we remove excess water that would otherwise steam the patty from the inside out. Simultaneously, the cheese acts as a binding agent and a moisture reservoir, melting into the vegetable mixture to create a cohesive, gooey center.
Furthermore, serving the burger on mashed potatoes instead of a bun solves the sogginess problem entirely. The potatoes act as an edible plate, absorbing the savory juices and gravy while providing a creamy contrast to the chewy patty. The final pour of warm gravy ties all elements together, ensuring that no component feels dry or disconnected. This isn’t just a sandwich; it’s a composed plate where every element supports the others.
Why You’ll Love This Recipe
- Juicy Interior: The stuffed vegetable-cheese core guarantees moisture, eliminating the dreaded dry burger texture.
- Elegant Presentation: The mashed potato base and gravy finish make it look like a restaurant-quality entrée.
- Customizable Protein: Works beautifully with ground beef, turkey, lamb, or high-quality plant-based mince.
- Vegetable Forward: Packs a full serving of colorful veggies directly into the protein, making nutrition delicious.
- Comfort Food Elevated: Combines the nostalgia of a burger with the soul-warming satisfaction of meat-and-potatoes.
Ingredient Notes
Quality ingredients define the outcome. Here is what you need and why specifics matter.
For the Patty & Filling
- Ground Protein: The video shows a pinkish raw meat, likely pork, veal, or a specific blend. Use 85/15 ground beef, ground turkey, or a firm plant-based mince for best binding. Leaner meats may result in a drier patty.
- Buying Tip: If using plant-based, choose one designed for cooking, not just heating.
- Fresh Spinach: Provides earthy flavor and vibrant green color. Must be wilted and squeezed DRY before stuffing. Wet spinach = exploded burger.
- Bell Peppers (Red/Yellow): Add sweetness and crunch. Dice finely so they cook through during the brief baking/searing time.
- Shredded Cheese: Mozzarella or mild cheddar works best. It needs to melt smoothly without separating. Avoid pre-shredded bags; the anti-caking agents prevent proper melting.
- Onion & Carrots: Julienned or finely diced. Adds aromatic depth and texture to the filling.
For the Base & Topping
- Potatoes (Yukon Gold or Russet): Yukon Golds are naturally buttery and hold shape better for mashing. Russets are fluffier but require more fat.
- Heavy Cream & Butter: Essential for rich, spreadable mash. Skim milk will make it gluey.
- Fresh Herbs (Chives/Parsley): Folded into the mash for color and freshness. Dried herbs won’t provide the same vibrancy.
- Gravy Base: Beef or vegetable stock, thickened with a roux (butter/flour) or cornstarch slurry. Season with soy sauce or Worcestershire for umami depth.
Kitchen Equipment
- Large Mixing Bowls: One for protein, one for veggies, one for mash.
- Skillet: For sautéing the vegetable filling.
- Baking Sheet + Parchment Paper: For shaping and initial cooking (if baking) or transferring to oven.
- Wood-Fired Oven OR Standard Oven + Cast Iron Skillet: The video uses a wood-fired oven for superior char. Home cooks can replicate this by searing in cast iron then finishing in a 400°F oven.
- Potato Masher or Ricer: For smooth, lump-free mash.
- Squeeze Bottle or Ladle: For precise gravy application.
- Food-Safe Gloves: Highly recommended for handling raw protein and shaping patties hygienically.
Preparation Information

- Prep Time: 30 Minutes
- Cook Time: 15-20 Minutes
- Total Time: 45-50 Minutes
- Servings: 4 Burgers
Step-by-Step Instructions
Follow these steps to achieve the structural integrity and flavor shown in the video.
H3: Prepare the Vegetable Filling
- Sauté Aromatics: Heat 1 tbsp oil in a skillet over medium heat. Add diced onions, carrots, and bell peppers. Cook 3-4 mins until softened but not browned.
- Wilt Spinach: Add fresh spinach. Toss constantly for 1-2 mins until just wilted.
- Why this matters: Raw spinach releases massive amounts of water when heated. Pre-cooking removes this moisture, preventing the patty from becoming soggy.
- Cool & Squeeze: Transfer mixture to a colander. Let cool slightly, then SQUEEZE firmly with hands or paper towels to remove ALL excess liquid.
- Visual Cue: The mixture should look compact, not wet. Liquid pooling in the bowl means failure later.
- Add Cheese: Mix cooled, squeezed veggies with shredded cheese. Set aside.
H3: Form & Stuff the Patties
- Season Protein: In a large bowl, gently mix ground protein with salt, pepper, and any desired spices (garlic powder, paprika). Do NOT overwork; this makes patties tough.
- Divide & Flatten: Divide meat into 4 equal portions. Flatten each into a wide, thin disc (about 1/4 inch thick). Make a shallow well in the center.
- Professional Tip: Wet hands slightly to prevent sticking. Keep discs wider than your final desired size; they will shrink when cooked.
- Stuff: Place 2-3 tbsp of veggie-cheese filling in the center of each disc. Fold edges up and over the filling, pinching seams tightly to seal.
- Critical Step: Ensure NO filling is exposed at the seams. Any gap will leak during cooking.
- Reshape: Gently press the sealed ball back into a thick patty (about 3/4 inch thick). Smooth cracks with damp fingers. Chill for 15 mins to firm up.
H3: Cook to Perfection
- Sear (Stovetop Method): Heat cast iron skillet over high heat with oil. Sear patties 2-3 mins per side until deep brown crust forms.
- Finish in Oven: Transfer skillet (or move patties to baking sheet) to 400°F (200°C) oven. Bake 8-12 mins until internal temp reaches 160°F (71°C) for beef/pork or 165°F (74°C) for poultry/plant-based.
- Wood-Fired Alternative: If using a pizza oven, cook directly on stone at 500°F+ for 3-5 mins total. Watch closely for char.
- Rest: Remove from heat. Let rest 5 mins on a wire rack. This allows juices to redistribute and cheese to set slightly.
H3: Assemble the Plate
- Prepare Mash: Boil peeled, cubed potatoes until fork-tender. Drain well. Mash with butter, cream, salt, pepper, and chopped herbs until smooth and spreadable.
- Plate Base: Spoon a generous mound of mash onto each plate. Use the back of a spoon to create a shallow well in the center.
- Place Patty: Set rested patty gently into the well.
- Top & Sauce: Top patty with extra sautéed veggies (reserved from earlier) and a slice of cheese if desired. Ladle warm gravy generously over the top, letting it cascade down the sides.
- Visual Cue: Gravy should pool slightly around the base but not submerge the patty entirely.
Expert Tips for the Perfect Stuffing
- Dry Veggies Are Non-Negotiable: I cannot stress this enough. Squeeze that spinach mixture like your burger depends on it—because it does. Moisture is the enemy of structure.
- Chill Before Cooking: Refrigerating shaped patties for 15-30 minutes firms up the fat and protein, reducing the chance of the seam bursting open during the sear.
- Don’t Overstuff: 2-3 tablespoons is plenty. Too much filling stretches the meat thin, causing leaks and uneven cooking.
- Seam Side Down First: When searing, place the patty seam-side DOWN first. The direct heat helps seal the closure immediately. Flip only once a crust has formed.
- Gravy Consistency: Gravy should coat the back of a spoon but still flow. Too thick = gloopy mess. Too thin = runs off the plate. Adjust with stock or cornstarch slurry as needed.
Common Mistakes to Avoid

| Mistake | Why It Happens | How to Fix/Prevent |
|---|---|---|
| Patty Explodes/Leaks | Wet filling; poor sealing; overstuffing. | Squeeze veggies DRY. Pinch seams tightly. Chill before cooking. |
| Dry/Crumbly Patty | Overworking meat; lean protein; overcooking. | Handle gently. Use 85/15 fat ratio. Use thermometer; don’t guess. |
| Soggy Bottom | Mash too wet; patty sitting in liquid. | Drain potatoes thoroughly. Create well in mash. Rest patty before plating. |
| Bland Flavor | Under-seasoning; no acid in gravy. | Season meat AND filling. Add splash of vinegar or lemon to gravy. |
| Burnt Exterior, Raw Center | Heat too high; patty too thick. | Sear hard, then finish in oven. Keep patties under 1 inch thick. |
Recipe Variations
Adapt this stuffed burger to any dietary need or craving.
- Spicy Jalapeño Popper: Add diced jalapeños and cream cheese to the filling. Top with chipotle aioli instead of gravy.
- Mediterranean Lamb: Use ground lamb. Stuff with feta, sun-dried tomatoes, and kalamata olives. Serve on tzatziki-swirled mash with lemon-herb gravy.
- Vegan Mushroom Swiss: Use plant-based mince. Stuff with sautéed mushrooms, caramelized onions, and vegan Swiss. Serve on cauliflower mash with onion gravy.
- BBQ Bacon Cheddar: Add crispy bacon bits and BBQ sauce to filling. Top with cheddar and serve on sweet potato mash.
- Italian Sausage Style: Use Italian sausage meat. Stuff with mozzarella, basil, and roasted red peppers. Serve on polenta with marinara drizzle.
- Low-Carb/Keto: Skip the potato base. Serve on a bed of creamy polenta or roasted eggplant slices. Thicken gravy with xanthan gum instead of flour.
- Breakfast Burger: Stuff with scrambled eggs, cheddar, and hash browns. Serve on grits with sausage gravy.
What to Serve With This Recipe
Balance the richness with fresh, acidic, or crunchy elements.
- Simple Green Salad: Arugula or mixed greens with vinaigrette cut through the heaviness.
- Pickled Vegetables: Quick-pickled red onions or giardiniera add necessary acid and crunch.
- Roasted Asparagus or Broccolini: Charred greens complement the savory profile.
- Craft Beer: An IPA or amber ale stands up to the rich gravy and cheese.
- Dessert: Lemon sorbet or berry tart. Avoid heavy chocolate after such a rich main.
Make Ahead & Meal Prep Tips
- Filling Prep: Sauté and squeeze veggies up to 3 days ahead. Store in airtight container. Bring to room temp before stuffing.
- Patty Assembly: Shape and stuff patties up to 24 hours ahead. Store covered in fridge. Chill thoroughly before cooking.
- Mash Prep: Make mash up to 2 days ahead. Reheat gently with splash of cream to restore texture.
- Gravy Base: Make gravy base (without final seasoning) up to 3 days ahead. Reheat and adjust consistency before serving.
- Freezer Option: Freeze UNCOOKED stuffed patties on baking sheet, then bag. Cook from frozen, adding 5-7 mins to bake time.
Storage & Reheating Instructions
Refrigerator
Store cooked patties and mash separately for up to 3 days. Gravy keeps 4 days.
Freezer
Freeze cooked patties (without gravy/mash) for up to 2 months. Mash freezes well; gravy may separate (re-whisk when reheating).
Reheating Methods
- Oven (Best): 350°F for 10-15 mins. Restores texture without drying.
- Air Fryer: 320°F for 5-7 mins. Crisps exterior nicely.
- Stovetop: Slice patty and reheat in skillet with splash of broth. Prevents drying.
- Microwave (Avoid): Makes patty rubbery and mash gluey. Only use if desperate, and cover with damp paper towel.
Nutritional Information
Approximate values per burger (with mash & gravy):
- Calories: 680 kcal
- Protein: 32g
- Carbohydrates: 45g
- Fat: 38g
- Fiber: 4g
- Sugar: 6g
- Sodium: 820mg
Note: Values vary based on protein choice, cheese amount, and gravy thickness.
Troubleshooting Guide
Problem: Patty falls apart when cutting. Solution: Filling was too wet or seam wasn’t sealed. Next time, squeeze veggies harder and pinch seams tighter. Chill patties longer before cooking.
Problem: Mash is gluey/sticky. Solution: Overworked potatoes or used waxy variety. Use russets/Yukons. Mash gently; never blend. Add warm cream/butter, not cold.
Problem: Gravy is lumpy. Solution: Roux wasn’t cooked properly or liquid added too fast. Whisk constantly when adding stock. Strain through sieve if lumps persist.
Problem: Patty is dry inside. Solution: Overcooked or lean meat. Use thermometer. Don’t exceed 160°F for beef. Add a pat of compound butter to hot patty while resting.
Frequently Asked Questions
1. Can I use ground chicken or turkey? Yes! These leaner proteins benefit greatly from the stuffed veggie technique. Just ensure you cook to 165°F internal temp. The moisture from the filling prevents dryness common with poultry burgers.
2. What if I don’t have a wood-fired oven? No problem! Sear in a screaming hot cast iron skillet for 2-3 mins per side, then transfer to a 400°F oven to finish. You’ll get excellent browning and even cooking.
3. Can I make this gluten-free? Absolutely. Use GF breadcrumbs in the meat mixture if needed for binding. Thicken gravy with cornstarch instead of flour. Ensure your plant-based mince (if using) is certified GF.
4. Why do my patties always leak cheese? Usually caused by wet filling or poor sealing. Squeeze veggies bone-dry. Leave a 1/2 inch border when stuffing. Pinch seams firmly and chill before cooking to solidify the fat.
5. Can I skip the mashed potatoes? You can, but the mash is integral to the dish’s balance. If skipping, serve on a toasted brioche bun or alongside roasted root vegetables. The gravy needs something to soak into!
6. How do I keep the spinach from turning slimy? High heat and quick cooking. Wilt it fast in a hot pan, then immediately remove and squeeze. Never let it sit in its own released water.
7. Can I freeze the assembled but uncooked burgers? Yes! Freeze on a baking sheet until solid, then bag. Cook from frozen, adding 5-7 minutes to bake time. Do not thaw before cooking to prevent sogginess.
8. What kind of cheese melts best for stuffing? Low-moisture mozzarella, provolone, or mild cheddar. Avoid fresh mozzarella (too wet) or aged cheeses (don’t melt smoothly). Shred your own for best results.
Final Thoughts
Mastering this Ultimate Stuffed Burger opens up a world of creative cooking possibilities. It proves that you don’t need fancy techniques or expensive ingredients to create something visually stunning and deeply satisfying. The beauty of this dish lies in its adaptability—use what you have, feed who you love, and enjoy the process of building something delicious layer by layer.