Quick Recipe Summary
| Detail | Information |
|---|---|
| Prep Time | 20 minutes |
| Cook Time | 2 hours 30 minutes (approx.) |
| Total Time | 3 hours (plus resting) |
| Servings | 6–8 |
| Cuisine | American / Classic Steakhouse |
| Course | Main Course / Holiday Dinner |
| Difficulty | Intermediate |
| Calories | ~550 kcal per serving |
Table of Contents
- Introduction
- Why This Recipe Works
- Why You’ll Love This Prime Rib Roast
- Ingredient Notes
- Kitchen Equipment
- Preparation Information
- Step-by-Step Instructions
- Expert Tips for the Best Prime Rib
- Common Mistakes to Avoid
- Recipe Variations
- What to Serve With This Recipe
- Make Ahead & Meal Prep Tips
- Storage & Reheating Instructions
- Nutritional Information
- Troubleshooting Guide
- Frequently Asked Questions
- Final Thoughts
Introduction

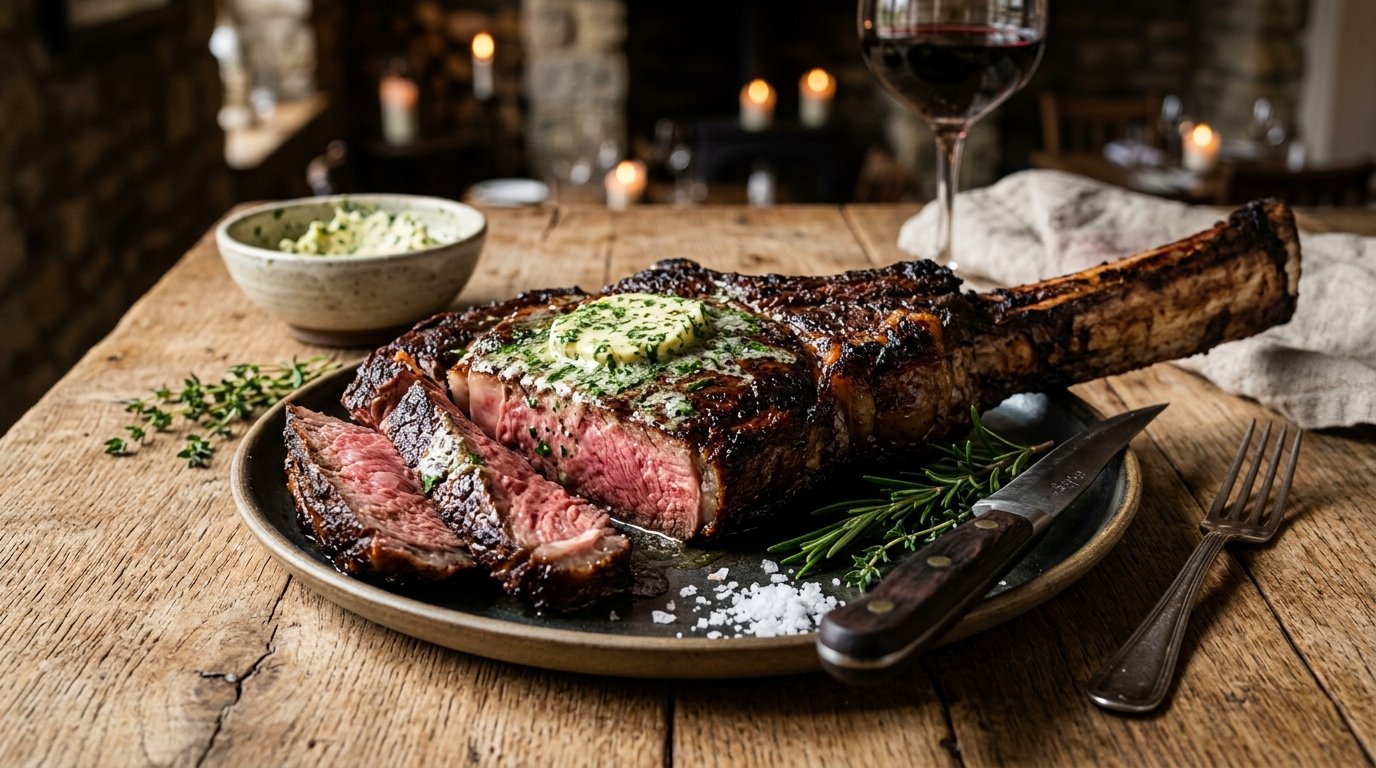
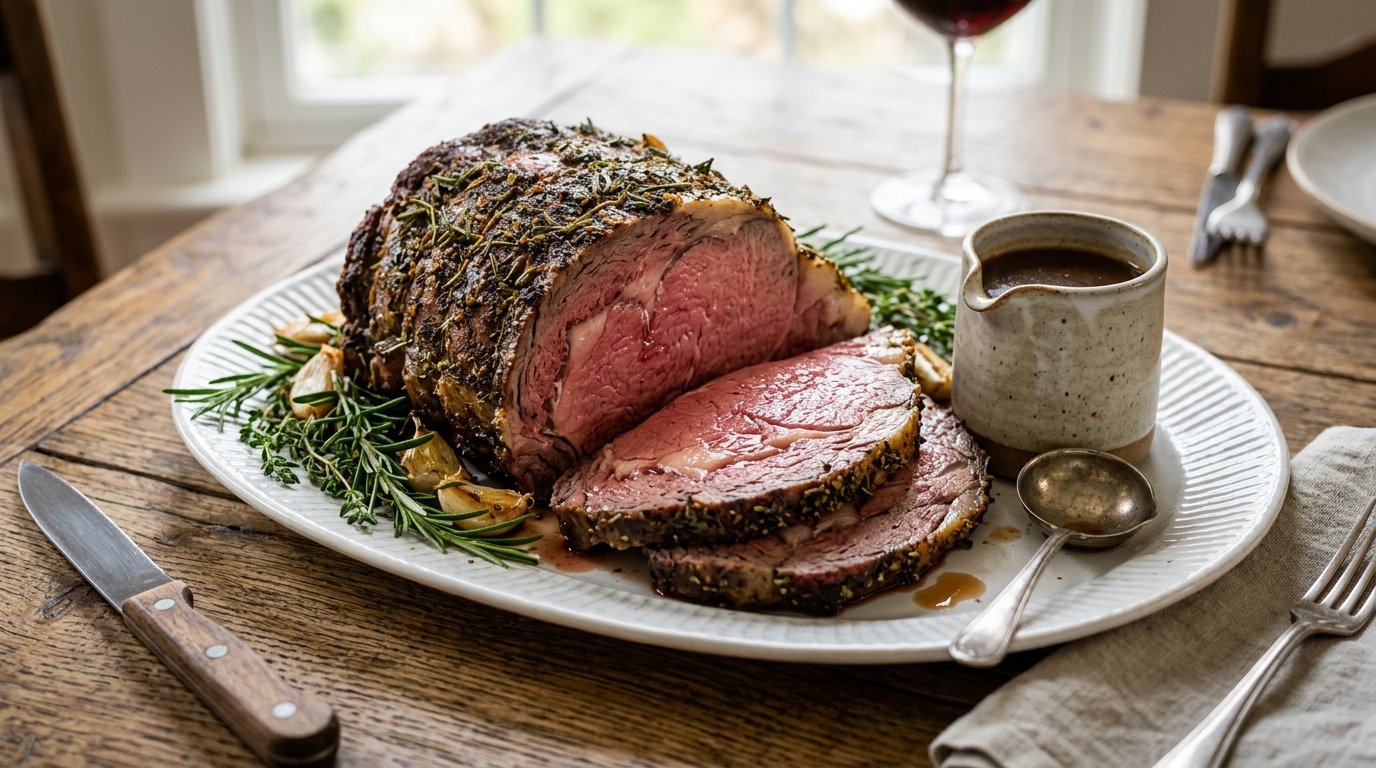
There are few centerpieces in the culinary world as commanding or as rewarding as a perfectly roasted Prime Rib. With its majestic crown of bones, deeply caramelized herb crust, and blushing pink interior, this cut is the undisputed king of holiday tables and special occasion dinners. But achieving that restaurant-quality edge-to-edge medium-rare perfection at home can feel intimidating. The secret lies not in complex techniques, but in patience, precision, and understanding the science of heat transfer.
This recipe guides you through creating a Prime Rib Roast that rivals any high-end steakhouse. We utilize a low-and-slow roasting method followed by a high-heat finish to ensure the meat is tender and evenly cooked without a thick band of gray overcooked meat near the crust. Topped with fresh rosemary and finished with a rich, glossy pan gravy made from the roast’s own drippings, this dish is a celebration of beef in its most elegant form. Whether you are hosting Christmas dinner or simply treating yourself to a Sunday feast, mastering this roast will earn you legendary status in your kitchen.
Why This Recipe Works
The success of this Prime Rib Roast relies on three critical pillars: temperature control, fat rendering, and resting. Prime rib is a heavily marbled cut with significant intramuscular fat and a thick external fat cap. Cooking it slowly at a lower temperature (typically 250°F–325°F depending on the method chosen) allows the collagen and connective tissues to break down gently without tightening the muscle fibers excessively. This results in a texture that is buttery soft rather than chewy.
The use of fresh rosemary isn’t just aesthetic; the essential oils in rosemary are fat-soluble. As the external fat cap renders during the roast, it bastes the herbs, infusing the meat with an aromatic, piney depth that complements the beef’s natural richness. Furthermore, the “reverse sear” or two-stage cooking approach seen in professional kitchens ensures that the internal temperature gradient is minimal. By bringing the roast up to temperature gently, we avoid the “bullseye” effect where the outer inch is well-done while the center is rare.
Finally, the resting period is non-negotiable. When meat cooks, its proteins contract and squeeze moisture toward the center. Resting allows these proteins to relax and reabsorb the juices. If you carve immediately, those precious juices—flavored with rendered fat and herbs—will pool on the cutting board instead of staying in the slice. The resulting pan gravy then utilizes those very drippings, creating a cohesive flavor loop from roast to sauce.
Why You’ll Love This Prime Rib Roast

- Edge-to-Edge Perfection: The controlled cooking method eliminates the gray band of overcooked meat, giving you uniform pinkness from crust to center.
- Foolproof Timing: Using a meat thermometer takes the guesswork out of doneness, ensuring consistent results every time.
- Incredible Flavor Depth: The combination of rendered beef fat, fresh rosemary, and savory pan gravy creates a complex, umami-rich profile.
- Impressive Presentation: A bone-in prime rib is visually stunning and serves as a natural conversation starter at any gathering.
- Versatile Leftovers: Cold prime rib makes exceptional sandwiches, and leftover bones are gold for stock.
- Customizable Doneness: Easy to adjust for guests who prefer medium or medium-rare by monitoring internal temp.
- Minimal Active Effort: Once the roast is in the oven, it requires very little attention, freeing you up to prepare sides and entertain.
- Gluten-Free Friendly: Naturally gluten-free when served with appropriate sides, making it inclusive for various diets.
Ingredient Notes
The Roast
- Bone-In Prime Rib (Standing Rib Roast): Aim for a 3-bone roast (approx. 6-7 lbs) for 6-8 people. The bones act as an insulator, protecting the meat closest to them from drying out, and add immense flavor.
- Substitution: Boneless ribeye roast works but cooks faster and lacks the structural protection of bones. Ask your butcher to tie the bones back onto a boneless roast if possible (“hotel style”).
- Buying Tip: Look for “USDA Prime” grade for maximum marbling. “Choice” is acceptable but leaner. Ensure the fat cap is white and firm, not yellow or slimy.
- Storage: Keep refrigerated until 2 hours before cooking. Can be dry-aged in the fridge (uncovered) for 3-5 days prior to intensify flavor and dry the surface for better browning.
The Seasoning Crust
- Fresh Rosemary: Essential for the classic aroma. Dried rosemary is too woody and won’t adhere as well to the fat cap.
- Substitution: Fresh thyme or sage can be used, or a mix. Avoid dried herbs for the crust; they burn easily at high finishing temps.
- Buying Tip: Buy live potted rosemary or fresh bundles. Strip leaves from woody stems and chop finely just before use to release oils.
- Kosher Salt & Coarse Black Pepper: The foundation of flavor. Kosher salt adheres better and seasons more evenly than table salt.
- Tip: Salt the roast generously at least 45 minutes before cooking, or ideally the night before. This acts as a dry brine, seasoning the meat deep inside and drying the surface for a superior crust.
- Garlic (Optional but Recommended): Minced fresh garlic adds pungency. Mix with chopped rosemary and oil/butter to create a paste that sticks to the fat cap.
The Pan Gravy

- Pan Drippings: The liquid gold left in the roasting pan. Contains rendered fat, caramelized meat juices (fond), and herb essence.
- Tip: Do not discard the brown bits stuck to the bottom of the pan! That is pure flavor. Deglaze with wine or broth to lift them.
- Beef Stock/Broth: Provides the body for the gravy. Use low-sodium so you can control salinity.
- Substitution: Bone broth for richer mouthfeel. Water in a pinch, but stock is far superior.
- Red Wine (Optional): Adds acidity and complexity to cut the richness of the beef fat. Cabernet Sauvignon or Merlot work best.
- Tip: Use wine you would drink. Cooking wine is often salty and poor quality.
- Butter (Cold): Whisked in at the end (“monter au beurre”) to emulsify the gravy, giving it a glossy sheen and velvety texture.
Kitchen Equipment
- Heavy-Duty Roasting Pan: Preferably with a rack. The rack elevates the meat, allowing hot air to circulate underneath and preventing the bottom from stewing in its own juices.
- Instant-Read Meat Thermometer: The single most important tool. Digital probe thermometers are accurate and fast. Never rely solely on time.
- Sharp Chef’s Knife or Carving Knife: A long, thin blade is essential for slicing between the bones cleanly without shredding the meat.
- Cutting Board: Large enough to accommodate the full roast. Juice grooves are helpful to catch runoff.
- Kitchen Twine: Necessary if you have separated the bones from the meat and need to tie them back on, or if the roast is unevenly shaped.
- Whisk & Saucepan: For making the gravy separately if your roasting pan isn’t stove-safe, or for finishing the sauce.
- Aluminum Foil: For tenting the roast during rest to keep it warm without trapping too much steam (which softens the crust).
- Basting Brush: For applying oil or butter to the fat cap before roasting.
Preparation Information
- Prep Time: 20 Minutes (active) + 2 Hours (tempering/salting)
- Cook Time: Approx. 2.5 – 3 Hours (varies by size/temp)
- Total Time: ~3.5 Hours
- Servings: 6–8 (based on 3-bone / 6-7 lb roast)
Step-by-Step Instructions
Preparing the Roast
Remove the prime rib from the refrigerator 2–3 hours before cooking to bring it to room temperature. Pat the entire surface completely dry with paper towels. Season generously on all sides with kosher salt and coarse black pepper. If using a garlic-rosemary paste, rub it firmly into the fat cap and exposed meat surfaces. Why it matters: Tempering ensures even cooking; a cold center leads to a raw middle and overcooked exterior. Drying the surface is crucial for browning—moisture creates steam, which prevents the Maillard reaction (crust formation). Salting early draws out moisture initially, which then reabsorbs, seasoning the meat internally. Visual Cue: Surface should look matte and dry, not wet or shiny. Salt should be visible but not caked. Pro Tip: If your butcher hasn’t already, ask them to separate the bones from the meat and tie them back on. This makes carving infinitely easier later—you just untie the string and slice between the bones.
The Reverse Sear Method (Low & Slow + High Heat Finish)
Preheat oven to 250°F (120°C). Place the roast fat-side up on a rack in a roasting pan. Insert your thermometer probe into the geometric center of the thickest part of the meat, avoiding bone or large fat pockets. Roast until the internal temperature reaches 115°F–120°F (for medium-rare target of 130°F after resting). This may take 2–3 hours. Remove from oven, increase oven temp to 500°F (260°C) (or use broiler), and return roast for 10–15 minutes to develop a deep brown crust. Watch closely! Why it matters: Low heat cooks the meat gently and evenly. The high-heat blast at the end creates the flavorful crust without overcooking the interior. This two-stage method is superior to traditional high-heat-only roasting for thick cuts. Texture/Aroma Cue: During low phase, smell is subtle beefy aroma. During high-heat blast, you’ll smell intense roasting, browning fats, and toasted herbs. Crust should be dark mahogany and crisp. Common Mistake: Leaving the roast in during the high-heat phase too long. The crust can go from perfect to burnt in 2 minutes. Set a timer and check frequently. Doneness Visuals: 120°F = Rare (cool red center). 130°F = Medium-Rare (warm pink center – IDEAL). 140°F = Medium (slightly pink). 150°F+ = Well Done (avoid for prime rib!).
Resting and Carving
Transfer the roast to a cutting board. Tent loosely with foil (do not seal tightly). Let rest for AT LEAST 30–45 minutes. The internal temperature will rise 5–10 degrees during this time (carryover cooking). To carve, remove twine/bones. Slice against the grain into ½-inch thick slices. For bone-in presentation, cut between the ribs to create individual chops, then slice the meat off the bone if desired. Why it matters: Resting redistributes juices. Cutting too soon releases them onto the board, leaving dry meat. Slicing against the grain shortens muscle fibers, making each bite tender. Visual Cue: Juices on the board should be minimal after proper rest. Meat should spring back slightly when pressed, not feel mushy or hard. Chef Tip: Save ALL juices that accumulate on the board during carving. Pour them into your gravy pot—they are concentrated beef essence.
Making the Pan Gravy
Place the roasting pan on the stovetop over medium heat (if safe) or transfer drippings to a saucepan. Skim excess fat if desired, leaving about 2 tbsp. Add ½ cup red wine (optional) and scrape up all browned bits (fond) with a wooden spoon. Simmer until reduced by half. Add 2 cups beef stock and simmer 5–10 minutes to meld flavors. Remove from heat. Whisk in 2 tbsp cold butter until melted and glossy. Season with salt/pepper to taste. Strain if desired for smoothness. Why it matters: Deglazing lifts the fond—the most flavorful part of the roast. Reduction concentrates flavor. Butter emulsification gives restaurant-quality shine and mouthfeel. Texture Cue: Gravy should coat the back of a spoon, not run like water. Should be smooth, not grainy. Aroma Cue: Deep, savory, wine-infused beef aroma. No raw alcohol smell. Pro Tip: If gravy is too thin, simmer longer to reduce. Too thick? Add splash of stock. Too greasy? Chill briefly and skim solidified fat from top.
Expert Tips for the Best Prime Rib
- Trust the Thermometer, Not the Clock: Every roast is different. Weight-based timing charts are guidelines only. Internal temperature is the ONLY reliable indicator of doneness. Calibrate your thermometer annually.
- Fat Cap Up, Always: Rendering fat bastes the meat as it melts downward. Fat-cap-down means the meat steams in its own grease and the top dries out.
- Don’t Over-Trim the Fat: Leave at least ¼-inch fat cap. It protects the meat during the high-heat blast and provides flavor. Trim excess only if >½ inch thick.
- Use a Rack: Elevating the roast prevents the bottom from becoming soggy and promotes even air circulation. No rack? Create one with rolled foil or bed of onions/carrots (adds flavor!).
- Carve Against the Grain: Identify the direction of muscle fibers. Cut perpendicular to them. This is especially important for the eye of the ribeye section.
- Save the Bones: Roasted rib bones make incredible beef stock. Freeze them if not using immediately.
- Room Temp is Key: Skipping the tempering step is the #1 cause of unevenly cooked prime rib. Plan ahead!
Common Mistakes to Avoid
- Overcooking: Prime rib is expensive. Pull it at 120°F–125°F for medium-rare. Carryover cooking brings it to 130°F. You cannot un-cook meat.
- Skipping the Rest: Impatience ruins great roasts. 30 minutes minimum. Use this time to make gravy and finish sides.
- Washing the Meat: Never rinse raw beef. It spreads bacteria and adds moisture that hinders browning. Pat dry instead.
- Crowding the Oven: Don’t bake cookies or casseroles alongside the roast. Airflow is critical for even cooking and crust development.
- Using Thin-Bottomed Pans: Lightweight pans scorch drippings, creating bitter gravy. Heavy-duty stainless steel or enameled cast iron is ideal.
- Slicing Too Thick: ½-inch is standard. Thicker slices can be overwhelming and harder to eat elegantly. Thinner slices showcase the pink center better.
- Ignoring Carryover Cooking: Removing roast at 130°F means it will reach 140°F+ while resting. Account for the 5°–10° rise.
Recipe Variations
- Spicy Rub: Add crushed red pepper flakes, cayenne, or smoked paprika to the salt/pepper rub for a Southwest kick.
- Horseradish Cream Sauce: Skip the gravy; serve with prepared horseradish mixed with sour cream, lemon juice, and chives. Classic pairing!
- Herb-Crusted Garlic Butter: Mix softened butter with minced garlic, rosemary, thyme, and parsley. Slather under and over the fat cap before roasting. Melts into the meat.
- Coffee-Chocolate Rub: Ground espresso + unsweetened cocoa powder + brown sugar + salt/pepper. Creates an incredibly deep, complex crust. Surprisingly amazing with beef.
- Asian-Inspired Glaze: Brush with mixture of soy sauce, ginger, garlic, and honey during last 20 minutes of cooking. Serve with scallion-ginger sauce instead of gravy.
- Low-Carb/Keto: Omit wine in gravy; use bone broth + xanthan gum to thicken. Serve with roasted broccoli or cauliflower mash instead of potatoes.
- High-Protein Boost: Serve with a side of grilled asparagus or sautéed spinach. The roast itself is already protein-dense (~40g/serving).
- Vegetarian Alternative: While not prime rib, a whole roasted cauliflower steak with similar herb crust and mushroom gravy mimics the presentation and satisfies vegetarians at the same table.
What to Serve With This Recipe
- Creamy Mashed Potatoes: The ultimate vehicle for pan gravy. Yukon Golds for buttery texture.
- Yorkshire Puddings: Traditional British accompaniment. Soaks up gravy beautifully.
- Roasted Root Vegetables: Carrots, parsnips, and Brussels sprouts roasted in beef fat echo the main’s flavors.
- Green Beans Almondine: Bright, crunchy contrast to rich meat. Toasted almonds add texture.
- Caesar Salad: Crisp, acidic start to balance the heavy main course.
- Red Wine: Cabernet Sauvignon, Malbec, or Syrah. Bold tannins cut through fat and complement beef.
- Crusty Bread: For sopping up every drop of gravy. Sourdough or baguette.
- Dark Chocolate Dessert: Flourless chocolate cake or molten lava cake. Richness mirrors the meal; bitterness cleanses palate.
Make Ahead & Meal Prep Tips
- Dry Brine Ahead: Salt the roast 24–48 hours before cooking. Store uncovered on a rack in the fridge. This is the BEST prep step for flavor and crust.
- Gravy Base Ahead: Make gravy base (drippings + wine + stock reduction) up to 2 days ahead. Refrigerate. Reheat and whisk in cold butter just before serving.
- Herb Paste Ahead: Chop herbs and mix with garlic/oil up to 3 days ahead. Store in small jar in fridge. Flavors meld beautifully.
- Sides Ahead: Most sides (mashed potatoes, roasted veggies) can be prepped 1 day ahead and reheated. Prime rib demands fresh attention, so prep everything else first.
- Thermometer Check: Test your thermometer in ice water (should read 32°F) before the big day. Calibration drift happens.
Storage & Reheating Instructions
Refrigerator
Store leftover sliced prime rib in airtight container with a splash of beef broth or gravy to prevent drying. Keeps 3–4 days. Whole unsliced roast keeps 4–5 days.
Freezer
Slice and freeze in portions with gravy in freezer-safe bags. Removes air aggressively. Keeps 2–3 months. Thaw overnight in fridge. Note: Texture changes slightly upon freezing; best for sandwiches or hash.
Reheating Methods
- Oven (Best for Slices): 250°F on wire rack over sheet pan. Warm 10–15 mins until 110°F internal. Prevents further cooking. Cover loosely with foil if concerned about drying.
- Stovetop (For Sandwiches/Hash): Slice thin. Sauté quickly in butter/oil over medium-high heat. 1–2 mins max. Adds crispy edges.
- Microwave (Last Resort): 50% power, 30-sec bursts. Cover with damp paper towel. Risk of rubbery texture is high. Only for emergency reheating.
- Air Fryer: 300°F for 3–5 mins. Good for crisping edges of slices. Monitor closely to avoid overcooking.
Nutritional Information
Estimates per 6oz serving (without gravy)
- Calories: 550 kcal
- Protein: 42g
- Carbohydrates: 1g
- Fat: 40g
- Fiber: 0g
- Sugar: 0g
- Sodium: 450mg (varies with salting)
Note: Values vary significantly based on trim level, cooking method, and portion size. Gravy adds ~50 kcal and 5g carbs per 2 tbsp.
Troubleshooting Guide
| Problem | Cause | Solution |
|---|---|---|
| Gray Band Around Edge | Cooked at too high temp throughout. | Use reverse sear next time. Low & slow first, then high heat finish. |
| Dry Meat | Overcooked or didn’t rest. | Pull at correct temp (120°F for MR). Rest 30+ mins. Slice thinner. |
| Pale, Soft Crust | Surface wet or oven too low. | Pat VERY dry before roasting. Ensure high-heat blast at end. Use convection if available. |
| Gravy Too Greasy | Didn’t skim fat or added too much butter. | Skim fat before deglazing. Chill gravy briefly to solidify fat, then skim. Reduce butter. |
| Gravy Too Thin | Insufficient reduction or no thickener. | Simmer longer to reduce. Whisk in cornstarch slurry (1 tsp starch + 1 tbsp water) or beurre manié. |
| Burnt Bottom Drippings | Pan too light or heat too high. | Use heavy pan. Lower heat when deglazing. Add liquid sooner. Scrape constantly. |
| Uneven Doneness | Roast irregular shape or no rack. | Tie roast uniformly. Use rack. Rotate pan halfway if oven has hot spots. |
| Tough Meat | Wrong cut or cooked past medium. | Ensure it’s actual prime rib/ribeye. Don’t exceed 135°F internal. Slice against grain. |
Frequently Asked Questions
1. How much prime rib do I need per person? Plan for ½ lb (8 oz) per person for generous servings, or ¾ lb if bones are included and you want leftovers. A 3-bone roast (6-7 lbs) serves 6-8 comfortably.
2. Can I cook prime rib in a slow cooker? Technically yes, but you won’t get a crust. Better method: Slow cook to temp, then finish under broiler or in screaming-hot oven for 10 mins to develop bark. Or use Instant Pot + air fryer lid combo.
3. What’s the difference between prime rib and ribeye steak? Same cut! Prime rib is the whole roast; ribeye is sliced from it before cooking. Prime rib is usually cooked bone-in and slower; ribeye steaks are grilled/seared individually.
4. Do I need to wash the prime rib before cooking? NO. Washing spreads bacteria via splashing water. Patting dry with paper towels is sufficient and necessary for browning. USDA advises against washing raw meat.
5. Can I use a boneless roast? Yes, but cooking time reduces by ~25%. Boneless roasts also lack the insulation bones provide, so monitor temp more closely. Ask butcher to tie it evenly for uniform shape.
6. How do I know when it’s done without a thermometer? You don’t reliably. Touch test (comparing firmness to palm) is subjective and inaccurate for large roasts. Invest in a $15 digital thermometer—it’s the best kitchen insurance you can buy.
7. Can I marinate prime rib? Not recommended. Marinades don’t penetrate thick roasts effectively and can make the surface mushy. Dry brining (salting ahead) is FAR superior for flavor and texture.
8. What if my roast is smaller/larger than 3 bones? Adjust cooking time proportionally, but ALWAYS rely on internal temperature, not time. Smaller roasts cook faster; larger ones take longer. Thermometer is your guide.
9. Can I freeze raw prime rib? Yes, wrap tightly in plastic + foil. Thaw in fridge 3-5 days before cooking. Quality degrades slightly vs. fresh, but still good. Never refreeze thawed raw beef.
10. Is prime rib the same as standing rib roast? Yes, identical cut. “Standing” refers to cooking it bone-side down so it stands upright. “Prime” refers to USDA grade, though colloquially used for any rib roast.
Final Thoughts
Mastering the Prime Rib Roast is less about technical prowess and more about respecting the ingredient and exercising patience. The reward—a succulent, herb-crusted centerpiece that brings people together—is worth every minute of careful preparation. Remember, the thermometer is your best friend, resting is non-negotiable, and the gravy is where magic happens. Don’t be intimidated by the size or cost of this cut; approach it with confidence and care, and you’ll create memories around your table for years to come.