
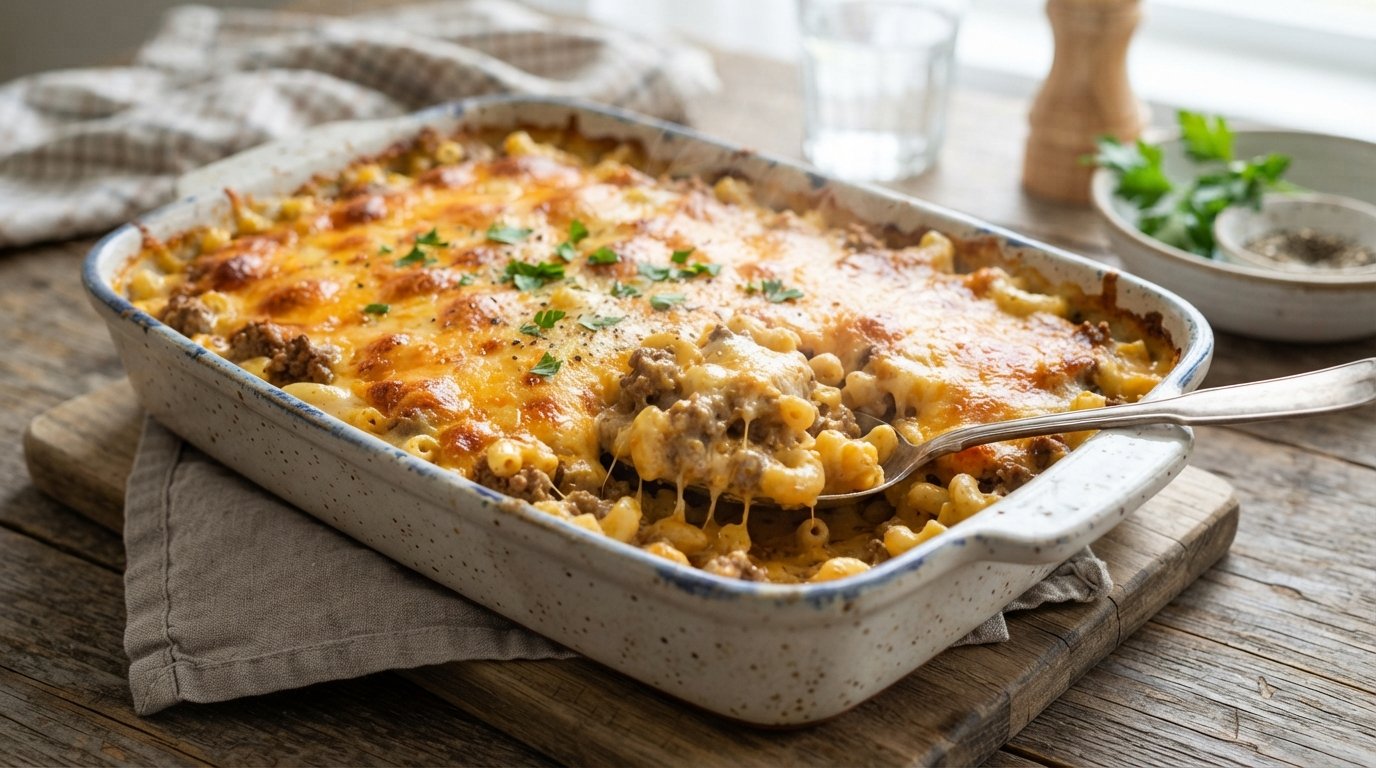
Quick Recipe Summary
| Feature | Details |
|---|---|
| Prep Time | 20 Minutes |
| Cook Time | 35 Minutes |
| Total Time | 55 Minutes |
| Servings | 6-8 |
| Cuisine | American Comfort Food |
| Course | Main Course / Dinner |
| Difficulty | Easy |
| Calories | ~580 kcal per serving |
Table of Contents
- Introduction
- Why This Recipe Works
- Why You’ll Love This Recipe
- Ingredient Notes
- Kitchen Equipment
- Preparation Information
- Step-by-Step Instructions
- Expert Tips for Perfect Texture
- Common Mistakes to Avoid
- Recipe Variations
- What to Serve With This Recipe
- Make Ahead & Meal Prep Tips
- Storage & Reheating Instructions
- Nutritional Information
- Troubleshooting Guide
- Frequently Asked Questions
- Final Thoughts
Introduction

There is a specific kind of comfort that only comes from a bubbling, golden-brown casserole fresh out of the oven. This cheesy beef and macaroni casserole is the ultimate embodiment of that feeling. It combines the nostalgic simplicity of homemade mac and cheese with the hearty satisfaction of a savory meat sauce, all baked under a blanket of melted cheddar. Unlike boxed mixes or dry casseroles, this recipe relies on a stovetop béchamel-based cheese sauce that ensures every bite is creamy, rich, and deeply flavorful.
The beauty of this dish lies in its balance. The tender elbow macaroni provides the perfect vehicle for the velvety cheese sauce, while the seasoned ground beef and colorful diced vegetables add texture, protein, and nutritional value. Whether you are feeding a hungry family on a busy weeknight or bringing a crowd-pleasing dish to a potluck, this beef macaroni casserole delivers consistent, delicious results. Let’s walk through exactly how to build layers of flavor that will have everyone asking for seconds.
Why This Recipe Works
The secret to a superior casserole is moisture management and sauce stability. Many recipes fail because they rely solely on evaporated milk or condensed soup, which can result in a grainy or overly salty final product. By making a traditional roux (butter and flour) and whisking in whole milk, we create a stable emulsion that holds up beautifully during baking.
Furthermore, cooking the pasta only until al dente before combining it with the sauce is crucial. The noodles will continue to absorb liquid in the oven. If they are fully cooked beforehand, they become mushy. The addition of diced bell peppers and onions not only adds color but also releases moisture during baking, keeping the interior of the casserole succulent rather than dry. Finally, the double layer of cheese—mixed into the sauce and sprinkled on top—creates a textural contrast between the creamy interior and the crispy, browned crust.
Why You’ll Love This Recipe
- One-Pot Sauce Efficiency: The cheese sauce is made in the same pot used to boil pasta (after draining), minimizing cleanup.
- Hidden Veggies: The finely diced peppers and onions blend seamlessly into the meat sauce, making them palatable even for picky eaters.
- Customizable Heat: The base recipe is mild, but it serves as a perfect canvas for adding jalapeños, hot sauce, or spicy sausage.
- Freezer Friendly: This casserole freezes exceptionally well, making it an ideal meal prep option for future busy nights.
- Crowd Pleaser: It bridges the gap between “kid food” and “adult comfort food,” satisfying both demographics simultaneously.
Ingredient Notes
Understanding your ingredients ensures the success of this cheesy beef and macaroni casserole.
Proteins & Produce
- Ground Beef (85/15): Leaner beef (90/10 or 93/7) works best here. Since we aren’t draining excessive fat for a roux later, too much grease can make the casserole heavy. The 15% fat content provides enough flavor without pooling oil.
- Elbow Macaroni: The classic choice. Its curved shape traps the cheese sauce and meat crumbles effectively. Cavatappi or cellentani are excellent substitutes if you want more surface area for sauce adherence.
- Bell Peppers & Onions: Dice these uniformly (approx. ¼ inch). Red, green, or orange peppers work; red adds sweetness, green adds a slight bitterness that balances the rich cheese. Yellow onions provide the best aromatic base.
- Garlic: Fresh minced garlic is preferred over powder for the meat base. It blooms in the oil and creates a deeper savory foundation.
Dairy & Pantry

- Unsalted Butter: Essential for the roux. Unsalted allows you to control the sodium level precisely, especially since cheese and beef contribute salt.
- All-Purpose Flour: Acts as the thickening agent. Do not substitute with cornstarch for a roux; flour provides the necessary opaque texture and nutty flavor classic to Mornay sauce.
- Whole Milk: Fat content matters. Skim milk will result in a thin, watery sauce that may separate when baked. Whole milk provides the richness needed to carry the cheese flavor.
- Sharp Cheddar Cheese: Always grate your own cheese from a block. Pre-shredded cheese contains anti-caking agents (like cellulose) that prevent it from melting smoothly, leading to a grainy sauce. Sharp cheddar cuts through the richness better than mild.
- Seasonings: Salt, black pepper, and paprika. Paprika adds a subtle warmth and color to the meat mixture without making it spicy.
Kitchen Equipment
- Large Pot (Dutch Oven or Stockpot): For boiling pasta and making the cheese sauce. A heavy-bottomed pot prevents scorching.
- Large Skillet: For browning the beef and sautéing vegetables.
- 9×13 Inch Baking Dish: Ceramic or glass is ideal for even heating. Metal pans can cause the edges to cook faster and potentially burn the cheese topping.
- Wooden Spoon or Spatula: For stirring the roux and scraping the pan.
- Colander: For draining pasta.
- Box Grater: For shredding cheese.
Preparation Information
- Prep Time: 20 Minutes (Chopping veggies, grating cheese, boiling water)
- Cook Time: 35 Minutes (20 min stovetop + 15-20 min bake)
- Total Time: 55 Minutes
- Servings: 6-8 generous portions
Step-by-Step Instructions
Follow this precise workflow to recreate the cheesy beef and macaroni casserole exactly as shown.
Phase 1: The Meat and Vegetable Base
H3: Build Flavor Foundations
- Sauté Aromatics: Heat 1 tablespoon of olive oil in a large skillet over medium-high heat. Add diced onions and bell peppers. Cook for 4-5 minutes until softened and translucent.
- Visual Cue: Onions should be glossy, not browned yet. Peppers should brighten in color.
- Why it matters: Softening vegetables first ensures they cook through in the casserole without releasing excess water later.
- Brown the Beef: Add ground beef to the skillet. Break it apart with a wooden spoon. Cook for 6-8 minutes until no pink remains.
- Aroma Cue: Savory, toasted meat smell.
- Texture Cue: Meat should be crumbly, not clumped.
- Season: Stir in minced garlic, salt, pepper, and paprika. Cook for 1 more minute to bloom the spices. Drain any excess grease if necessary, but leave about 1 teaspoon for flavor. Set aside.
Phase 2: The Stovetop Cheese Sauce
H3: Create the Velvety Emulsion
- Boil Pasta: While meat cooks, bring a large pot of salted water to a boil. Add elbow macaroni. Cook for 2 minutes less than package directions (al dente). Drain and return to the pot.
- Why al dente? Pasta absorbs sauce in the oven. Overcooked pasta = mushy casserole.
- Make Roux: In the same pot (wiped clean if needed), melt 4 tablespoons butter over medium heat. Whisk in ¼ cup flour. Cook for 1-2 minutes, stirring constantly.
- Visual Cue: Mixture bubbles and turns pale gold. Raw flour smell disappears.
- Common Mistake: Burning the roux makes sauce bitter. Keep heat moderate.
- Add Milk: Gradually pour in 3 cups whole milk while whisking vigorously. Continue whisking until smooth and simmering. Cook 3-5 minutes until thickened (coats back of spoon).
- Texture Cue: Sauce should be nappe consistency—thick enough to leave a trail when you run a finger through it.
- Melt Cheese: Remove pot from heat. Stir in 3 cups grated sharp cheddar until smooth. Season with salt and pepper.
- Critical Tip: Never boil cheese sauce. High heat breaks emulsion. Off-heat melting keeps it silky.
- Combine: Fold drained pasta and cooked meat/veg mixture into the cheese sauce. Stir gently to coat everything evenly.
Phase 3: Assembly and Baking
H3: Bake to Golden Perfection
- Transfer: Pour mixture into greased 9×13 baking dish. Spread evenly.
- Top with Cheese: Sprinkle remaining 1 cup cheddar over the top. Distribute evenly for consistent browning.
- Bake: Place in preheated 375°F (190°C) oven. Bake for 20-25 minutes.
- Visual Cue: Edges bubble vigorously. Top is golden brown with spotted caramelization.
- Doneness Check: Internal temperature should reach 165°F. Center should be set, not jiggly.
- Rest: Let casserole rest 10 minutes before serving. This allows sauce to thicken slightly and prevents burning mouths.
Expert Tips for Perfect Texture

- Cheese Temperature Matters: Cold cheese added to hot sauce can seize. Let grated cheese sit at room temp for 15 minutes before incorporating. Alternatively, add it off-heat in small batches.
- Pasta Water Reserve: Before draining pasta, reserve ½ cup starchy water. If sauce seems too thick when combining, splash in some pasta water. The starch helps bind sauce to noodles.
- Vegetable Size Consistency: Uniform dice ensures even cooking. Large chunks of pepper remain crunchy and watery; tiny dice melts into the sauce invisibly. Aim for ¼-inch pieces.
- Broiler Finish: If top isn’t browned enough after baking, switch to broil for 2-3 minutes. Watch closely! Cheese goes from perfect to burnt in seconds. Move rack to upper third.
Common Mistakes to Avoid
- Grainy Sauce: Caused by overheating cheese or using pre-shredded. Fix: Remove from heat before adding cheese. Grate your own. If grainy, blend with immersion blender.
- Dry Casserole: Caused by overcooking pasta or insufficient sauce. Fix: Undercook pasta. Ensure sauce is generously coated before baking. Cover with foil first 15 mins if drying out.
- Soggy Bottom: Caused by wet vegetables or under-drained pasta. Fix: Sauté veggies thoroughly to release moisture. Shake colander well after draining pasta.
- Bland Flavor: Cheese and pasta dilute seasoning. Fix: Taste sauce before combining. It should taste slightly too salty/seasoned alone. Adjust meat seasoning boldly.
- Burnt Top, Cold Center: Oven too hot or dish too deep. Fix: Use 375°F, not 400°F+. Tent with foil if browning too fast. Ensure dish isn’t overfilled.
Recipe Variations
- Spicy Tex-Mex: Add 1 tsp cumin, ½ tsp chili powder to meat. Mix in ½ cup diced green chiles. Top with pepper jack cheese instead of cheddar.
- Vegetarian: Omit beef. Substitute with 2 cups roasted broccoli florets or 1 can drained black beans. Increase cheese by ½ cup for richness.
- Chicken Version: Swap beef for 2 cups shredded rotisserie chicken. Reduce cook time for meat phase. Add ½ cup frozen peas for color.
- Low-Carb/Keto: Replace pasta with 1 lb cauliflower florets (steamed al dente). Use heavy cream instead of milk. Almond flour for roux.
- Extra Cheesy: Mix in ½ cup cream cheese or sour cream with cheddar. Adds tang and extra creaminess. Top with panko breadcrumbs mixed with melted butter for crunch.
- BBQ Twist: Stir ¼ cup BBQ sauce into meat mixture. Use smoked gouda instead of cheddar. Top with crispy fried onions.
What to Serve With This Recipe
Balance the richness with acidic, crisp, or light sides.
- Simple Green Salad: Arugula or spinach with lemon vinaigrette cuts through heaviness.
- Garlic Bread: Classic pairing for soaking up extra cheese sauce.
- Steamed Green Beans: Tossed with almonds and lemon zest. Adds freshness and crunch.
- Tomato Cucumber Salad: Vinegar-based dressing provides necessary acid contrast.
- Iced Tea or Sparkling Water: Bubbles and tannins cleanse palate between rich bites.
- Fruit Salad: Berries or melon offer sweet, refreshing finish to heavy meal.
Make Ahead & Meal Prep Tips
- Assemble Ahead: Prepare entire casserole up to 24 hours before baking. Cover tightly and refrigerate. Add 10-15 mins to bake time since starting cold.
- Component Prep: Cook meat/veg mix and grate cheese up to 3 days ahead. Store separately. Boil pasta day-of for best texture.
- Freezing: Assemble unbaked casserole. Wrap tightly in plastic + foil. Freeze up to 3 months. Thaw overnight in fridge before baking. Add 20 mins to bake time.
- Portion Control: Divide into individual containers before freezing. Reheat single servings easily for lunches.
Storage & Reheating Instructions
Storage
- Refrigerator: Store leftovers in airtight container for up to 4 days.
- Freezer: Cooked casserole freezes well for up to 3 months. Portion before freezing for easier reheating.
Reheating
- Oven (Best): Cover with foil. Reheat at 350°F for 20-25 mins until bubbly. Uncover last 5 mins to crisp top.
- Microwave: Single portions only. Cover with damp paper towel. Heat 1-min intervals, stirring between. Prevents rubbery cheese.
- Air Fryer: Great for reviving crispy top. 350°F for 5-7 mins. Watch closely to prevent burning.
- Stovetop: Gentle reheat in skillet with splash of milk. Restores creaminess lost in fridge. Low heat only.
Nutritional Information
Estimates per serving (based on 8 servings)
- Calories: 580 kcal
- Protein: 32g
- Carbohydrates: 48g
- Fat: 28g
- Saturated Fat: 14g
- Cholesterol: 85mg
- Sodium: 720mg
- Fiber: 3g
- Sugar: 5g
Note: Values vary based on cheese brand, beef fat %, and portion size.
Troubleshooting Guide
| Problem | Cause | Solution |
|---|---|---|
| Sauce Separated/Oily | Overheated cheese or low-fat dairy. | Blend with immersion blender. Next time, use full-fat dairy & off-heat melting. |
| Pasta Mushy | Overcooked before baking or sat in sauce too long. | Undercook pasta. Combine just before baking. Don’t let sit >10 mins before oven. |
| Top Burnt, Center Cold | Oven too hot or dish too deep. | Lower temp to 375°F. Tent with foil. Use shallower dish. |
| Bland Taste | Underseasoned components. | Taste sauce before combining. Season meat boldly. Add pinch of mustard powder to sauce. |
| Too Thick/Dry | Not enough liquid or over-reduced sauce. | Splash in reserved pasta water or milk. Cover with foil while baking. |
| Watery Bottom | Wet veggies or under-drained pasta. | Sauté veggies longer. Drain pasta thoroughly. Let rest 10 mins before serving. |
Frequently Asked Questions
1. Can I use different pasta shapes? Yes! Shells, cavatappi, or rotini work great. Avoid long pasta like spaghetti—it doesn’t hold sauce well in casseroles. Small shapes ensure every bite has meat, veg, and cheese.
2. Why is my cheese sauce grainy? Usually from high heat or pre-shredded cheese. Anti-caking agents prevent smooth melting. Always grate your own cheese and remove pot from heat before adding it.
3. Can I make this gluten-free? Absolutely. Use GF elbow pasta and substitute flour with cornstarch (1 tbsp cornstarch + 2 tbsp cold milk slurry) for thickening. Verify cheese is GF-certified.
4. How do I prevent soggy casserole? Key steps: Sauté veggies until soft (removes water), drain pasta well, don’t overcook pasta before baking, and let casserole rest 10 mins after baking to set.
5. Can I use ground turkey or chicken? Yes! Leaner meats work fine. Add 1 tbsp oil when browning since they lack fat. Season generously as poultry is milder than beef.
6. Is this freezer-friendly? Very! Assemble unbaked, wrap tightly, freeze up to 3 months. Thaw overnight in fridge before baking. Add 15-20 mins to bake time.
7. Why rest before serving? Resting allows sauce to thicken slightly and redistributes moisture. Cutting immediately causes sauce to run out and burns mouths. 10 mins is ideal.
8. Can I add breadcrumbs on top? Yes! Mix ½ cup panko with 2 tbsp melted butter. Sprinkle over cheese last 5 mins of baking. Adds delightful crunch contrast to creamy interior.
Final Thoughts
This cheesy beef and macaroni casserole is more than just dinner—it’s a hug in a baking dish. The combination of tender pasta, savory beef, and velvety cheese sauce creates a symphony of comfort that never goes out of style. Whether you’re feeding a family, meal prepping for the week, or simply craving something deeply satisfying, this recipe delivers consistently delicious results.
1 thought on “Cheesy Beef and Macaroni Casserole with Creamy Cheddar Sauce”