These sausage egg and cheese biscuit breakfast cups deliver everything you want in a grab-and-go morning meal: flaky biscuit dough, savory sausage, a perfectly set egg, and melted cheese in one tidy package. Made in a standard muffin tin, they come together with minimal hands-on time and bake into golden, self-contained cups that stay neat whether you’re serving them at the table or packing them for later. The combination of canned biscuit dough, pre-cooked sausage patties, and a simple egg-and-cheese topping creates reliable results every time, making this recipe ideal for busy weekdays or relaxed weekend brunches.
Why This Recipe Works
The success of these breakfast cups comes from smart layering and controlled heat. Pressing the biscuit dough into greased muffin cups creates sturdy walls that hold the filling without collapsing. Placing a pre-cooked sausage patty in the base adds flavor and prevents the egg from sinking. A whole egg cracked on top cooks gently in the enclosed space, while a square of cheese melts into a creamy lid. Covering each cup with a second piece of dough seals in moisture and produces an even golden crust. Baking at a moderate temperature ensures the dough cooks through without over-browning the cheese or drying out the egg.
Why You’ll Love This Recipe
Ready in about 35 minutes from start to finish
Uses simple, widely available ingredients
Portable and mess-free for breakfast on the go
Customizable with different proteins, cheeses, or seasonings
Kid-friendly and crowd-pleasing for brunch
Freezer-friendly for make-ahead mornings
Minimal cleanup thanks to the muffin tin format
Ingredient Notes
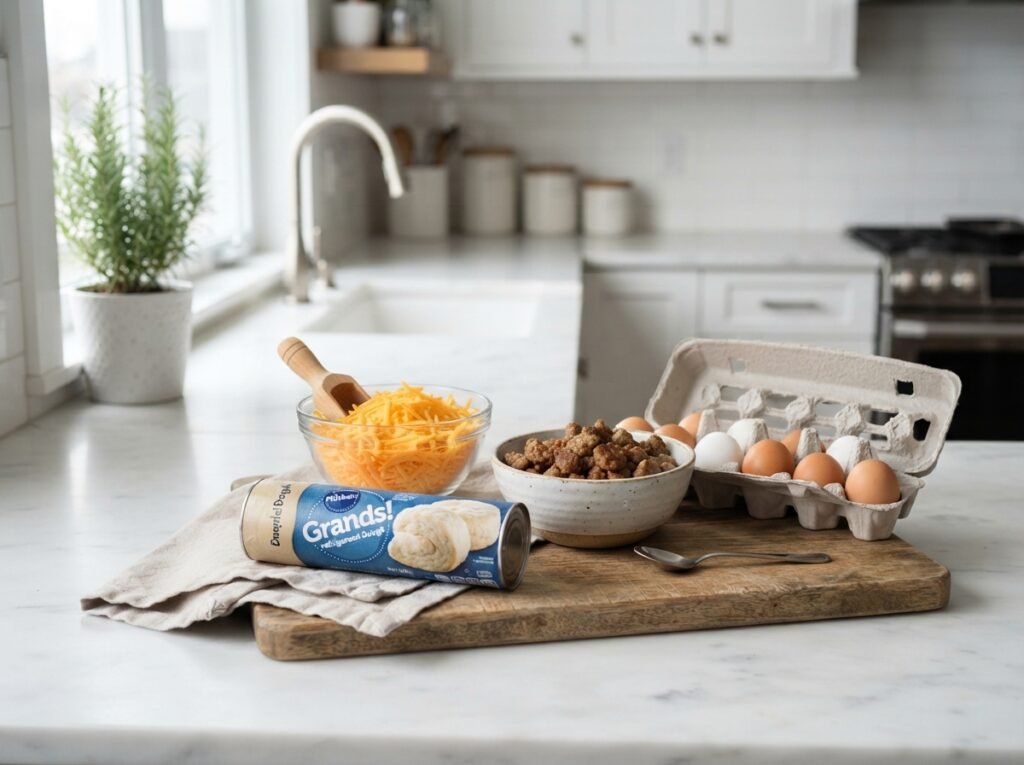
Canned biscuit dough – The foundation of the cups. Refrigerated biscuit dough (the kind sold in tubes) provides consistent rise and flaky layers. Look for the regular or “flaky layers” style rather than the jumbo size so the pieces fit the muffin cups easily. Substitute homemade biscuit dough if preferred, rolled to about ¼-inch thickness and cut into rounds.
Breakfast sausage patties – Pre-cooked or fully cooked sausage rounds work best for speed and even cooking. Mild or maple varieties both pair well. If using raw sausage, form into small thin patties and brown them first. Turkey or chicken sausage can be swapped for a lighter option.
Large eggs – One egg per cup yields a balanced yolk-to-white ratio. Room-temperature eggs crack more cleanly and cook more evenly. For a firmer set, whisk the eggs lightly before adding; for a runnier yolk, leave them whole.
Cheese slices – American, cheddar, or Colby-Jack melt smoothly and create that classic breakfast sandwich flavor. Sharp cheddar adds more bite; pepper jack brings mild heat. Shredded cheese can be used in a pinch, but a single slice sits neatly and melts evenly.
Cooking spray or oil – Essential for releasing the finished cups cleanly. A light, even coat prevents sticking without making the bottoms greasy.
Salt and black pepper – Season the eggs just before baking. A light sprinkle is usually enough because the sausage and cheese already contribute salt.
Kitchen Equipment
Standard 12-cup muffin tin
Cooking spray or pastry brush for oil
Can opener (if needed for the biscuit dough)
Spoon or small spatula for pressing dough
Mixing bowl (optional, if whisking eggs)
Oven mitts
Wire rack for cooling Optional: kitchen shears for cutting dough, silicone muffin liners for even easier release
Preparation Information
Prep Time: 15 minutes Cook Time: 18–22 minutes Total Time: 35 minutes Servings: 6–8 cups (depending on biscuit size and how many cups you fill)
Step-by-Step Instructions
Prepare the Muffin Tin
Preheat the oven to 375°F (190°C). Lightly coat every cup of a standard muffin tin with cooking spray, making sure to reach the bottom and sides. This step is critical—biscuit dough can stick, and a thorough coat guarantees clean release after baking.
Shape the Biscuit Bases
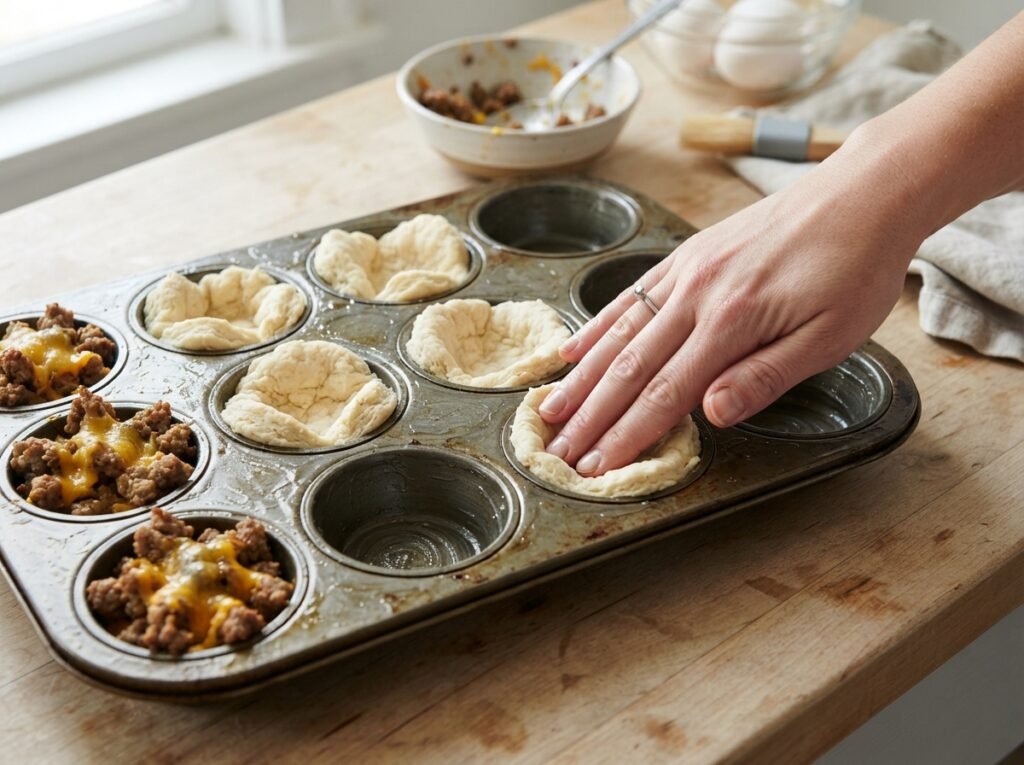
Open the can of biscuit dough and separate the biscuits. Press one biscuit into the bottom and up the sides of each prepared muffin cup, forming a shallow bowl. The dough should come up about halfway to two-thirds of the way up the sides. If the biscuits are large, gently stretch or flatten them first. Even thickness prevents thin spots that can tear or burn.
Add the Sausage
Place one cooked sausage patty in the center of each dough-lined cup. The sausage acts as a sturdy base and keeps the egg from soaking into the bottom crust. If the patties are thick, gently press them flat so they sit level.
Crack the Eggs
Carefully crack one large egg into each cup on top of the sausage. Try to keep the yolk intact for the classic sunny appearance. If any white overflows, simply wipe the edge of the tin. Season lightly with salt and freshly ground black pepper.
Top with Cheese and Dough
Lay a square of cheese over the egg, tucking the corners slightly if needed. Cover each cup with a second piece of biscuit dough, pressing the edges gently to seal against the bottom dough. A light seal keeps the cheese from leaking while still allowing steam to escape.
Bake Until Golden
Place the muffin tin on the center rack and bake for 18–22 minutes. The tops should turn deep golden brown, the dough should feel set when lightly pressed, and the cheese should be fully melted. Steam rising from the cups is a good visual cue that the eggs are cooked through. Avoid opening the oven door too early, as the sudden temperature drop can cause the dough to sink.
Cool and Serve
Remove the tin from the oven and let the cups rest for 3–5 minutes. This short rest firms the structure so they lift out cleanly. Run a thin knife or offset spatula around the edges if needed, then transfer to a wire rack or serving plate. Serve warm.
Expert Tips
Work quickly once the dough is opened—refrigerated biscuit dough softens at room temperature and becomes harder to handle. If the sausage patties are very fatty, blot them lightly with a paper towel so excess grease doesn’t make the bottoms soggy. For evenly cooked eggs, try to crack them from the same height and avoid breaking the yolks. A light brush of melted butter on the top dough before baking adds extra color and flavor. If your oven runs hot, start checking at the 16-minute mark to prevent over-browning.
Common Mistakes
Skipping the grease on the tin leads to stuck cups. Always spray thoroughly. Overfilling the cups causes overflow and uneven baking. Stick to one sausage, one egg, and one cheese slice. Baking at too high a temperature browns the tops before the dough cooks through. 375°F is the sweet spot. Removing the cups too soon can cause them to collapse. Give them a few minutes to set. Using cold eggs straight from the fridge can create uneven cooking; a brief rest at room temperature helps.
Recipe Variations
Spicy – Use hot sausage and pepper jack cheese; add a pinch of red pepper flakes with the black pepper. Vegetarian – Replace sausage with sautéed mushrooms, spinach, or a plant-based sausage patty. Extra Cheesy – Add a second half-slice of cheese under the top dough or sprinkle shredded cheese on top before baking. Healthy – Choose turkey sausage, reduced-fat cheese, and whole-grain biscuit dough if available. Low-Carb – Skip the biscuit dough and use thin slices of deli ham or cheese as the “cup.” High-Protein – Add a second small sausage patty or stir a tablespoon of cottage cheese into the egg before cracking. Chicken or Beef – Swap in cooked chicken sausage or small cooked ground-beef patties seasoned with breakfast spices.
What to Serve With This Recipe
Fresh fruit salad or sliced berries keep the meal bright. Crisp hash browns or roasted breakfast potatoes add satisfying crunch. A simple green salad or arugula with lemon vinaigrette balances the richness. Hot sauce, ketchup, or a dollop of avocado crema for dipping. Fresh orange juice, coffee, or a light mimosa for brunch. For dessert-style balance, a small yogurt parfait or cinnamon-sugar fruit.
Make Ahead Tips
Assemble the cups up to the point of baking the night before. Cover the tin tightly with plastic wrap and refrigerate. In the morning, remove the wrap and bake as directed, adding 2–3 extra minutes if the tin is cold.
Meal Prep Tips
Bake a full batch on Sunday. Once cooled, wrap each cup individually in foil or place in airtight containers. They reheat well and stay tasty for several days, making weekday breakfasts effortless.
Storage Instructions
Refrigerator: Store cooled cups in an airtight container for up to 4 days. Freezer: Wrap individually in plastic wrap then foil, or place in a freezer bag. Freeze up to 2 months. Thaw overnight in the refrigerator before reheating.
Reheating Instructions
Oven: 350°F for 8–10 minutes until warmed through. Air Fryer: 320°F for 4–6 minutes. Microwave: 30–45 seconds on medium power; cover with a damp paper towel to prevent drying. Stovetop: Warm gently in a covered skillet over low heat with a splash of water to create steam.
Nutritional Information
(Approximate values per cup, based on standard ingredients; actual numbers vary by brand and exact size) Calories: 320–380 Protein: 14–18 g Carbohydrates: 22–28 g Fat: 18–24 g Fiber: 1–2 g Sugar: 3–5 g Sodium: 650–850 mg
Troubleshooting Guide
Dough not browning evenly – Rotate the tin halfway through baking and check oven temperature with an independent thermometer. Cheese leaking – Make sure the top dough is sealed around the edges and avoid overfilling. Eggs overcooked or rubbery – Reduce bake time by 2 minutes or use slightly larger cups so the eggs sit lower. Bottoms soggy – Blot sausage and ensure the tin is thoroughly greased; bake on a lower rack if needed. Cups stuck in the tin – Let them cool 5 minutes, then run a thin knife around each edge before lifting.
Frequently Asked Questions
Can I use crescent roll dough instead of biscuits? Yes. Crescent dough works well; press the seams together and shape into cups the same way.
Do I have to use pre-cooked sausage? No, but raw sausage should be cooked and drained first so excess fat doesn’t pool in the cups.
Can I make these without cheese? Absolutely. The cups still hold together and taste great with just sausage and egg.
How do I know when the eggs are done? The whites should be fully set and the yolks still slightly soft or just firm, depending on preference. The top dough will be golden.
Are these freezer-friendly? Yes. Cool completely, wrap well, and freeze up to 2 months. Reheat from thawed or add a couple of minutes if heating from frozen.
Can I double the recipe? Yes. Use two muffin tins or bake in batches. Keep the second tin in the refrigerator while the first bakes.
What if my biscuits are jumbo size? Cut each jumbo biscuit in half or stretch and thin it so it fits the cup without overflowing.
Can I add vegetables? Finely chopped spinach, diced peppers, or green onions can be sprinkled over the sausage before adding the egg. Keep quantities small so the cups don’t overflow.
Final Thoughts
Sausage egg and cheese biscuit breakfast cups prove that a satisfying morning meal doesn’t have to be complicated. With a handful of everyday ingredients and one muffin tin, you get flaky, savory, cheese-pulled cups that feel special yet stay practical. Once you try them, you’ll find yourself reaching for the recipe whenever you need a reliable breakfast that travels well and feeds a crowd without stress. Give them a bake this weekend, then come back and let me know how they turned out—your comments and ratings help other home cooks succeed too.