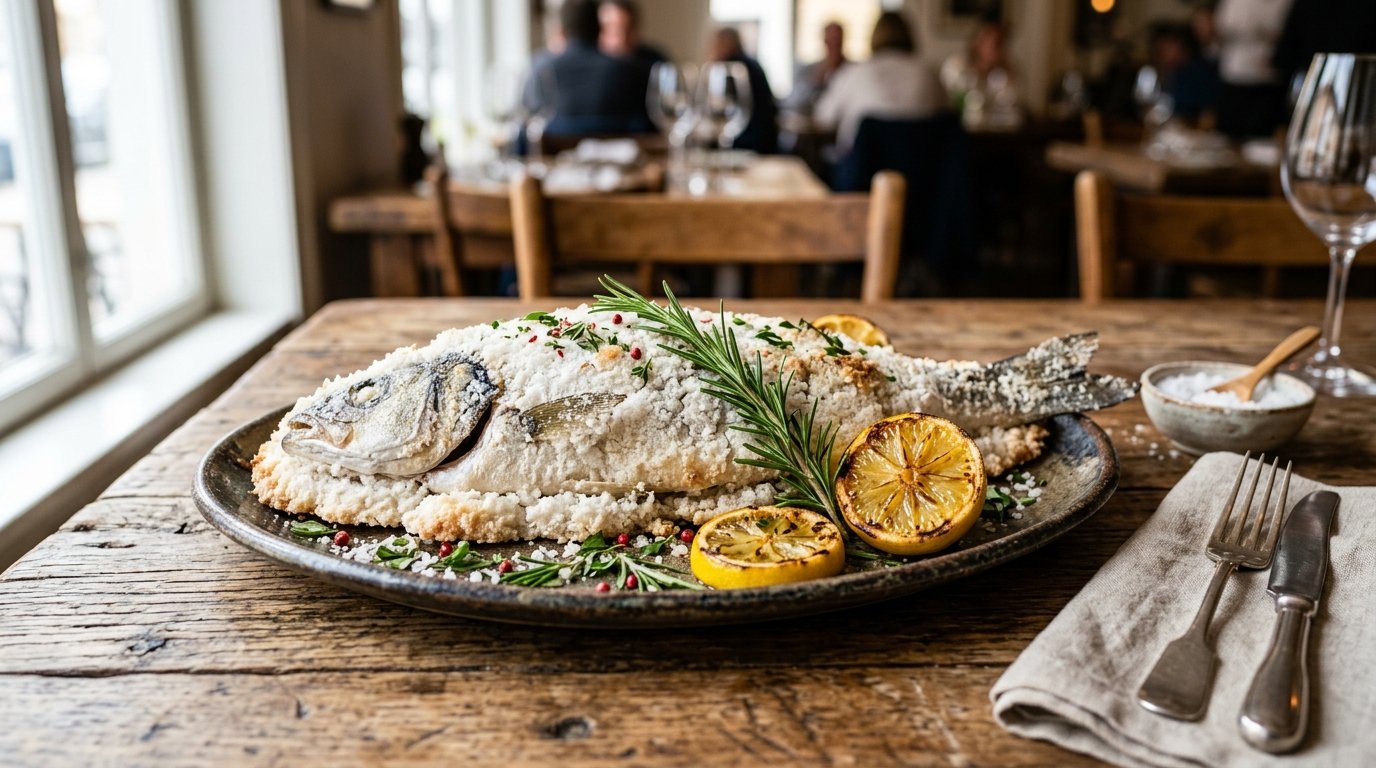
There is a distinct moment of theater in cooking that separates a good meal from an unforgettable one. Imagine placing a whole fish onto the table, encased in a golden, hardened shell of salt, and then cracking it open with a knife to reveal steaming, impossibly moist white flesh beneath. This is the magic of Salt-Baked Whole Fish, a technique that feels intimidatingly professional but is actually one of the most forgiving methods for home cooks. Unlike grilling or pan-searing, where timing is measured in seconds and dryness is a constant threat, baking in salt creates a self-regulating steam chamber. The salt crust acts as an insulator, cooking the fish gently and evenly while locking in every drop of natural moisture and aromatic essence. If you have ever been hesitant to cook a whole fish at home because you fear ruining it, this recipe is your answer. It transforms a simple sea bream (or similar white fish) into a centerpiece dish that tastes like a seaside holiday, requiring nothing more than patience, coarse salt, and fresh herbs.
Quick Recipe Summary
| Feature | Details |
|---|---|
| Prep Time | 20 minutes |
| Cook Time | 25–30 minutes |
| Total Time | 50 minutes |
| Servings | 2–3 people |
| Cuisine | Mediterranean / French |
| Course | Main Course |
| Difficulty | Medium (Technique-heavy, execution-easy) |
| Calories | Approx. 320 per serving |
Table of Contents
- Why This Recipe Works
- Why You’ll Love This Recipe
- Ingredient Notes
- Kitchen Equipment
- Step-by-Step Instructions
- Expert Tips for Perfect Salt Baking
- Common Mistakes to Avoid
- Recipe Variations
- What to Serve With Salt-Baked Fish
- Make Ahead & Meal Prep Tips
- Storage & Reheating Instructions
- Nutritional Information
- Troubleshooting Guide
- Frequently Asked Questions
- Final Thoughts
Why This Recipe Works

The science behind Salt-Baked Whole Fish is rooted in thermodynamics and osmosis. When you encase a fish in a thick layer of coarse salt and egg white (which acts as a binder), you create a sealed environment. As the oven heats the salt crust, the moisture inside the fish turns to steam. Because the crust is impermeable, that steam cannot escape; instead, it circulates around the fish, poaching it in its own juices. This gentle, humid heat denatures proteins slowly, preventing the muscle fibers from tightening and squeezing out moisture—the primary cause of dry fish. Furthermore, the salt does not make the fish salty. The crust is too thick and dense for significant salt penetration during the short cooking time. Instead, it seasons the surface subtly while the interior remains perfectly balanced. The result is a texture that is simultaneously firm and yielding, with a purity of flavor that no other cooking method can replicate.
Why You’ll Love This Recipe
- Impossible to Dry Out: The steam-baking effect guarantees moist flesh even if you leave it in the oven a few minutes too long.
- Dramatic Presentation: Cracking the crust tableside is a showstopper that elevates any dinner party.
- Minimal Active Effort: Once the fish is packed, you simply wait. No flipping, no basting, no monitoring.
- Clean Flavor Profile: Without heavy sauces or marinades, you taste the true quality of the seafood.
- Forgiving Technique: Unlike precise searing, salt baking allows for a wider window of doneness.
- Natural Non-Stick: The skin releases effortlessly from the scales after baking, leaving pristine fillets.
Ingredient Notes
Success in Salt-Baked Whole Fish depends entirely on ingredient quality and selection. Here is what you need to know:
Whole White Fish (Sea Bream/Dorade/Snapper)
- Purpose: The star protein. Must be whole, scaled, and gutted.
- Buying Tips: Look for clear, bulging eyes, bright red gills, and firm flesh that springs back when pressed. Sea bream (dorade) is ideal due to its flat shape and moderate fat content. Red snapper or branzino are excellent alternatives. Avoid fish with sunken eyes or slimy skin.
- Substitutions: Any whole white fish weighing 1–1.5 lbs works. Avoid oily fish like mackerel or salmon for this specific technique, as their strong flavors clash with the delicate salt steam.
- Storage Tips: Keep on ice or in the coldest part of the fridge until ready to use. Cook within 24 hours of purchase for best texture.
Coarse Kosher Salt or Sea Salt
- Purpose: Building material for the crust; heat conductor.
- Buying Tips: MUST be coarse grain. Fine table salt will compact too densely, creating a concrete-like shell that is impossible to crack and may over-season the fish. Diamond Crystal Kosher or coarse French grey salt are ideal.
- Quantity: You will need approximately 3–4 lbs (1.5–2 kg). Do not skimp; the crust must be at least 1/2 inch thick all around.
- Substitutions: None. Do not use iodized table salt.
Egg Whites
- Purpose: Binder to hold the salt crust together.
- Buying Tips: Fresh large eggs. Separate carefully; yolk contamination weakens the structure.
- Quantity: 3–4 whites for a standard fish.
- Substitutions: Water can work in a pinch but creates a weaker crust that may crumble prematurely. Aquafaba (chickpea water) is a vegan alternative but less reliable structurally.
Fresh Herbs (Rosemary, Thyme, Parsley)
- Purpose: Aromatic infusion into the cavity and steam.
- Buying Tips: Woody herbs like rosemary and thyme withstand high heat better than delicate basil or cilantro. Ensure they are dry before stuffing; wet herbs create excess steam that can weaken the crust.
- Substitutions: Sage, oregano, bay leaves, or fennel fronds. Avoid soft leafy herbs that burn instantly.
Lemon
- Purpose: Acidic brightness and aroma.
- Buying Tips: Heavy, thin-skinned lemons yield more juice and zest. Organic is preferred since zest contacts the fish directly.
- Usage: Slice half for cavity, reserve half for serving. Zest can be added to the salt mixture for extra fragrance.
Kitchen Equipment

- Rimmed Baking Sheet: Essential. The salt crust will leak moisture; a rimless sheet will flood your oven. Line with parchment paper for easier cleanup.
- Large Mixing Bowl: For combining salt and egg whites.
- Kitchen Shears: For scoring the fish skin (optional but helpful).
- Pastry Brush: For applying egg white wash to fish surface (helps salt adhere).
- Heavy-Duty Spoon or Mallet: For cracking the baked crust.
- Fish Spatula: Thin, flexible metal spatula for lifting fillets without breaking them.
- Instant-Read Thermometer: Crucial for verifying doneness without guesswork.
- Serving Platter: Large enough to hold the entire cracked fish presentation.
Step-by-Step Instructions
Follow these steps precisely to ensure your Salt-Baked Whole Fish emerges perfectly cooked and easy to serve.
H3: Preparing the Fish and Oven
- Preheat and Prep: Preheat oven to 400°F (200°C). Line a rimmed baking sheet with parchment paper. Pat the fish completely dry inside and out with paper towels.
- Why it matters: Surface moisture prevents salt adhesion and creates steam pockets between skin and crust, leading to uneven cooking. Dry skin = crispier exterior under the crust.
- Visual Cue: Skin should look matte, not shiny or damp.
- Professional Tip: Score the skin diagonally 2-3 times on each side, cutting just through skin into flesh. This allows heat penetration and prevents skin from splitting unpredictably.
- Season the Cavity: Generously stuff the fish cavity with lemon slices, rosemary sprigs, thyme, and parsley. Season the cavity lightly with pepper (no salt needed inside).
- Why it matters: Aromatics infuse the flesh from the inside out as steam circulates. Pepper adds warmth without competing with the salt crust’s subtle seasoning.
- Aroma Cue: Crush herbs slightly between fingers before stuffing to release essential oils.
- Common Mistake: Overstuffing. Leave space for steam circulation; tightly packed herbs block heat flow.
- Brush with Egg White: Lightly brush the entire exterior of the fish with beaten egg white.
- Why it matters: Acts as glue for the salt crust. Without it, salt slides off during packing, creating thin spots that burn or crack prematurely.
- Texture Cue: Fish should feel tacky, not dripping wet.
H3: Creating and Applying the Salt Crust
- Mix the Crust: In a large bowl, combine 3 lbs coarse salt with 3-4 egg whites. Mix with hands until the consistency resembles wet sand. It should clump when squeezed but not be soupy.
- Why it matters: Proper hydration ensures the crust holds its shape. Too dry = crumbles; too wet = soggy shell that doesn’t insulate.
- Visual Cue: Mixture should hold a peak when lifted, similar to meringue texture.
- Pack the Base: Spread a 1/2-inch thick bed of salt mixture on the prepared baking sheet, shaped roughly to the fish’s length.
- Why it matters: Prevents bottom scorching and ensures even heat distribution underneath.
- Tip: Make the bed slightly larger than the fish to accommodate shrinkage during baking.
- Encase the Fish: Place the fish on the salt bed. Pack remaining salt mixture over and around the fish, pressing firmly to eliminate air pockets. Ensure the crust is uniformly 1/2 to 3/4 inch thick everywhere. Completely cover the head and tail.
- Why it matters: Air pockets create hot spots that can burn the fish or cause the crust to collapse. Uniform thickness = uniform cooking.
- Visual Cue: Fish silhouette should be barely visible beneath a smooth, solid mound of salt.
- Common Mistake: Leaving gaps near the head/tail. These thin areas cook fastest and can lead to overdone extremities.
H3: Baking and Testing Doneness
- Bake: Place in preheated oven. Bake for 25–30 minutes for a 1–1.5 lb fish. The crust should turn light golden brown and feel hard to the touch.
- Why it matters: Golden color indicates proper Maillard reaction on the crust surface, signaling sufficient internal temperature. Hardness confirms structural integrity.
- Aroma Cue: You may smell faint herbal notes escaping; this is normal. Strong fishy odor means the crust has cracked—check immediately.
- Visual Cue: Crust should be pale gold, not dark brown (which indicates overheating).
- Verify Temperature: Insert instant-read thermometer through the thickest part of the crust into the fish’s center (near the backbone). Target 135–140°F (57–60°C).
- Why it matters: Carryover cooking will raise temp 5-10°F after removal. Pulling at 135°F ensures perfect flakiness without dryness.
- Texture Cue: At target temp, flesh will be opaque and separate easily from bone.
- Professional Tip: If no thermometer, insert a skewer through crust into thickest flesh. Hold against lip; it should feel warm, not hot. Flesh should resist slightly then yield.
- Rest: Remove from oven. Let rest 5–10 minutes before cracking.
- Why it matters: Allows juices to redistribute and crust to set slightly, making cracking cleaner and safer (steam is less violent).
- Safety: Steam inside is extremely hot. Resting reduces pressure buildup.
H3: Cracking and Serving
- Crack the Crust: Use the back of a heavy spoon or small mallet to tap firmly along the top ridge of the crust. Work from head to tail, creating a fracture line. Lift away the top shell in large pieces.
- Why it matters: Controlled cracking preserves the fish’s presentation. Random smashing can damage the delicate flesh underneath.
- Visual Cue: Crust should break cleanly along score lines. If it crumbles into powder, it was too dry; if it bends, it was underbaked.
- Remove Skin and Fillet: Peel away the top skin layer (it should come off in one sheet with the scales attached). Use a fish spatula to lift the top fillet away from the spine. Remove the spine and ribs in one piece. Lift the bottom fillet onto the serving platter.
- Why it matters: The skin acts as a protective barrier during baking; removing it reveals pristine, unblemished flesh.
- Texture Cue: Flesh should flake in large, moist segments, not shred.
- Garnish: Drizzle with high-quality olive oil, fresh lemon juice, and scattered herb leaves before serving.
Expert Tips for Perfect Salt Baking
- Weigh Your Salt: Consistency is key. For a 1.5 lb fish, use exactly 3 lbs salt + 4 egg whites. Eyeballing leads to variable results.
- Double-Line the Pan: Salt moisture can corrode pans and stick stubbornly. Parchment + foil underneath provides insurance and makes cleanup trivial.
- Use a Rack for Cooling: After cracking, transfer fish to a wire rack briefly before plating. This prevents residual heat from continuing to cook the bottom fillet in pooled juices.
- Save the Salt: Unused, uncontaminated salt from the crust can be rinsed, dried, and reused 2-3 times for roasting vegetables or curing. Discard if it touched raw fish juices directly.
- Test with Smaller Fish First: If new to the technique, practice with a smaller (1 lb) fish to calibrate your oven’s actual temperature and timing before attempting a large centerpiece.
- Zest the Lemon Into the Salt: Adding lemon zest directly to the salt-egg mixture perfumes the entire crust, creating an aromatic experience when cracked open.
Common Mistakes to Avoid
- Using Fine Salt:
- Why: Compacts into an impenetrable brick; impossible to crack cleanly; risks over-salting.
- Fix: Always use coarse kosher or sea salt. Grind slightly if grains are excessively large, but never use table salt.
- Under-Packing the Crust:
- Why: Thin spots burn; air pockets cause uneven cooking; crust collapses.
- Fix: Press firmly and uniformly. Check thickness visually before baking; add more mixture if any area looks <1/2 inch.
- Overcooking:
- Why: Even with salt protection, prolonged heat dries out protein.
- Fix: Trust the thermometer. Pull at 135°F. Remember carryover cooking. Better slightly under than over.
- Cracking Too Soon:
- Why: Violent steam release can burn hands; crust shatters messily; fish falls apart.
- Fix: Rest minimum 5 minutes. Tap gently first to test hardness. Use controlled strikes.
- Skipping the Egg White Binder:
- Why: Salt slides off; crust lacks cohesion; leaks moisture onto pan.
- Fix: Always brush fish with egg white and mix whites into salt. Non-negotiable step.
- Stuffing Cavity Too Tightly:
- Why: Blocks steam circulation; cavity doesn’t cook through; aromatics don’t infuse.
- Fix: Stuff loosely. Herbs should move slightly when fish is jiggled.
Recipe Variations
Adapt Salt-Baked Whole Fish to explore different flavor profiles:
- Citrus Fennel: Replace rosemary with fresh fennel fronds and orange slices. Add fennel seeds to the salt mixture. Bright, anise-forward profile perfect for spring.
- Asian Ginger-Soy: Stuff cavity with ginger slices, scallions, and star anise. Serve with soy-ginger dipping sauce instead of lemon. Umami-rich twist.
- Spicy Harissa: Mix harissa paste into the egg white-salt blend. Stuff with preserved lemon and cilantro. North African-inspired heat and depth.
- Herb Garden Medley: Use equal parts tarragon, chervil, parsley, and chives (classic fines herbes). Delicate, French bistro elegance.
- Low-Sodium Adaptation: Reduce salt by 20% and replace volume with coarse breadcrumbs mixed with egg white. Less traditional but still effective insulation with reduced sodium exposure.
- Vegan “Fish” Option: Use king oyster mushroom stems scored to mimic fish texture, or large tofu blocks pressed and marinated. Same salt-baking technique applies; adjust time to 15-20 mins.
- Wine-Infused Crust: Replace 1 egg white with 2 tbsp dry white wine in the salt mixture. Adds subtle acidity and complexity to the steam environment.
- Smoked Paprika Crust: Add 2 tbsp smoked paprika to the salt mixture. Imparts beautiful color and smoky depth without actual smoking equipment.
What to Serve With Salt-Baked Fish

Complement the delicate, clean flavors with sides that enhance rather than compete:
- Boiled New Potatoes with Dill: Simple, starchy base that soaks up any released juices. Classic Mediterranean pairing.
- Arugula Salad with Shaved Parmesan: Peppery greens and salty cheese contrast the mild fish beautifully. Dress lightly with lemon vinaigrette.
- Ratatouille or Roasted Vegetables: Summer squash, eggplant, and peppers roasted with olive oil mirror the rustic elegance of the main.
- Saffron Rice or Couscous: Absorbs flavors elegantly; saffron’s floral notes complement the fish’s sweetness.
- Dry White Wine (Vermentino or Albariño): Crisp, mineral-driven wines match the saline, clean profile without overpowering.
- Lemon Olive Oil Cake: Light, citrusy dessert continues the theme without heaviness. Perfect palate cleanser after rich fish.
Make Ahead & Meal Prep Tips
- Pre-Mix Salt Crust: Combine salt and egg whites up to 24 hours ahead. Store covered at room temperature. Stir before use; separation is normal.
- Clean and Stuff Fish Early: Scale, gut, and stuff the fish up to 4 hours ahead. Keep refrigerated, uncovered, on a rack to maintain dry skin. Bring to room temp 20 mins before packing.
- Pre-Crack Strategy (Advanced): For parties, bake and crack the fish 10 mins before serving. Keep warm in 200°F oven, tented loosely with foil. Fillets stay moist; crust stays intact for presentation.
- Portion Control: Pre-fillet the fish after baking and portion onto plates. Keeps individual servings neat and eliminates tableside mess for formal dinners.
- Herb Prep: Wash, dry, and chop herbs 1 day ahead. Store in damp paper towel in container. Freshness is critical for aroma.
Storage & Reheating Instructions
Refrigerator Storage
Store leftover fillets (skin removed) in airtight container up to 2 days. The salt crust itself should be discarded after cracking; do not store fish in crust as moisture accumulation ruins texture.
Freezer Storage
Not recommended. Salt-baked fish’s delicate texture degrades significantly upon freezing and thawing. Best enjoyed fresh. If necessary, freeze fillets in vacuum-sealed bags up to 1 month; expect some texture loss.
Reheating Methods
- Oven (Best): Preheat 275°F. Place fillets on parchment-lined sheet. Warm 8-10 mins until just heated through. Gentle heat preserves moisture.
- Steaming: Place fillets in steamer basket over simmering water 3-4 mins. Restores lost moisture effectively. Ideal for slightly dried leftovers.
- Microwave (Last Resort): Cover with damp paper towel. Heat 30-sec intervals. High risk of rubbery texture; only use if speed is critical.
- Stovetop: Not recommended. Direct heat toughens delicate reheated fish. Use only for incorporating into salads or pastas where texture change is acceptable.
Nutritional Information
Approximate values per serving (based on 3 servings, fish only):
- Calories: 320
- Protein: 42g
- Carbohydrates: 2g
- Fat: 14g
- Fiber: 0g
- Sugar: 0g
- Sodium: 480mg (Note: Most salt remains in crust; actual intake is lower than total salt used)
Disclaimer: Sodium content varies based on crust thickness and cooking time. Values reflect estimated absorption, not total salt used. Consult nutritionist for precise dietary tracking.
Troubleshooting Guide
| Problem | Cause | Solution |
|---|---|---|
| Crust Won’t Crack | Underbaked; too much egg white; fine salt used | Tap harder with mallet. Next time: bake 5 mins longer; reduce egg whites; use coarser salt. |
| Fish Is Salty | Crust too thin; cooked too long; fine salt used | Rinse fillets briefly under cold water. Next time: ensure 1/2″+ crust; verify timing; use coarse salt only. |
| Fish Falls Apart When Filleting | Overcooked; rested too little; wrong fish type | Chill fillets 5 mins before handling. Next time: pull at 135°F; rest 10 mins; use firmer fish like snapper. |
| Crust Collapses During Baking | Too wet mixture; insufficient packing; oven temp too low | Drain excess liquid next time. Pack firmer. Verify oven calibration with thermometer. |
| Skin Sticks to Flesh | Fish not dried before brushing; scored too deep | Pat drier next time. Score only through skin, not into flesh. Brush thinner egg white layer. |
| Cavity Undercooked | Overstuffed; fish too large for time | Stuff loosely next time. Increase time 5-7 mins for >1.5 lb fish. Verify cavity temp with probe. |
| Burnt Bottom | Pan too close to heating element; no parchment | Move rack up one level. Always use parchment + foil double-layer. |
| Bland Flavor | Insufficient aromatics; no acid finish | Increase herb quantity. Always finish with fresh lemon juice and good olive oil post-cracking. |
Frequently Asked Questions
Can I reuse the salt crust? Yes, if it didn’t touch raw fish juices directly. Break it up, rinse thoroughly, spread on baking sheet, and dry in 250°F oven for 30 mins. Store in airtight container. Reuse 2-3 times max. Discard if discolored or odorous.
What if I don’t have a whole fish? Salt baking requires a whole fish for structural integrity and steam trapping. Fillets will dry out and lack the protective scale barrier. For fillets, use parchment en papillote method instead.
How do I know the fish is done without a thermometer? Insert a thin skewer through the crust into the thickest flesh near the backbone. Hold against your inner wrist. It should feel warm (not hot) and meet slight resistance before yielding. Flesh should appear opaque, not translucent.
Can I use rock salt instead of kosher salt? Yes, if it’s food-grade and coarse. Some rock salts are mined for industrial use and contain impurities. Ensure packaging states “food grade” or “culinary.” Himalayan pink salt works beautifully and adds visual appeal.
Why did my crust turn dark brown/black? Oven temperature too high or rack positioned too close to top element. Salt burns at ~450°F+. Reduce temp to 400°F and move rack to center. Dark crust tastes bitter and may indicate overcooked fish.
Is this recipe safe for people with hypertension? The salt crust acts as a barrier; minimal sodium penetrates the flesh during typical cooking times. Studies show salt-baked fish contains significantly less sodium than boiled or seasoned fish. However, consult your physician if strictly sodium-restricted.
Can I add vegetables to the salt crust? Yes! Small potatoes, carrots, or pearl onions can be embedded in the crust base. They steam alongside the fish and absorb its flavors. Ensure they’re cut uniformly small to cook through in the same timeframe.
What’s the best way to remove bones after baking? After lifting the top fillet, locate the central spine. Grip it firmly near the head end with tongs or fingers (use towel if hot). Gently pull toward the tail; the entire skeleton should lift away cleanly, leaving rib bones attached to the spine. Check for pin bones with fingertips before serving.
Final Thoughts
Mastering Salt-Baked Whole Fish is less about following rigid rules and more about embracing a meditative cooking process. There is something profoundly satisfying about trusting the transformation that occurs inside that humble salt shell—watching a humble ingredient become something extraordinary through patience and heat. This technique teaches us that sometimes the best results come from restraint: letting the ingredient speak for itself, protected and nurtured rather than manipulated.